Tuesday, December 31, 2019

Welcoming the New Year … with wool

A very happy last day of 2019 to all. I hope that you have been enjoying a wonderful and blessed holiday season. I had very grand intentions of a Christmas-themed post featuring a quilt I completed a few years ago. The time got the better of me, so this will be just a short post to highlight a recently completed project for January and to provide a sneak preview of the beginnings of a 2020 project.
This past summer, my local quilt shop began the Buttermilk Basin "Welcome Home" wall hanging as a block-of-the-month project. It had been a while since I had taken on a weekly or monthly series, so I decided to give this one a go. I try to be pretty selective with any series such as this one that I pursue. While I do have more than my fair share of UFOs sitting in my sewing room, I don't like to acquire blocks associated with a series only to have them sit in an unfinished pile.

As you can see from these two pictures, the project features a quilted banner and then each month's circle fits into the "O" in HOME. The photo at the start of this post features the January circle. I was delighted to see the snowman and cardinal included in this design. I'm one who waits until after Christmas to put up some of my snowman decorations. I always feel like I need something to fill the void after the Christmas decorations come down. In case you are interested, here is a link to my snowman quilt post from a few years ago. I've also included a close up of the "H" in the banner so that you can see some of the embroidered embellishment down the left edge of the letters.
Here's a quick sneak peek at what is likely to be in store for my 2020 stitching. I wrote previously about stitching wool projects on my flights to and from France in October. In honor of that trip to France, my daughter bought me this Joyeux Noel block from Buttermilk Basin. This is the first block in the series, and I'm not sure yet how many to anticipate. I guess we will find out. At any rate, I wanted to get the fusing done before my daughter goes back to college so that she could get a better look.
I hope that you will all have a wonderful 2020. I've told my husband that I want us to make a list of 20 things to do together in the new year. Two that are already on our list are 1) a hike to go see wildflowers when they are in bloom and 2) going snowshoeing. My goal is to get our list made by the end of the day January 1 so that we can be intentional about making plans.
On the topic of making plans, I do enjoy the opportunity each December 31/January 1 to reflect on the past year and to contemplate the coming  year. A few days ago, I was sorting through some past sermon notes dated December 30, 2007. These included a reminder of the choices that do lie before us. While many of us will likely encounter at least some circumstances that are beyond our control, more often than not, the choices that we can control largely influence our circumstances. As I close with these words spoken by Moses as the children of Israel were about to enter the Promised Land, consider how you will respond to the choices that you encounter in the coming year. Happy New Year!
I call heaven and earth to witness against you today, that I have set before you life and death, the blessing and the curse. So choose life in order that you may live, you and your descendants, by loving the LORD your God, by obeying His voice, and by holding fast to Him; for this is your life and the length of your days, that you may live in the land which the LORD swore to your fathers, to Abraham, Isaac, and Jacob, to give to them. Deuteronomy 30:19-20.

Thursday, December 19, 2019

Gingerbread Biscotti

Baking is one of my favorite Christmastime activities. While I enjoy pulling out traditional family recipes, I also enjoy the opportunity to add another treat to my repertoire of recipes. In recent years, gingerbread biscotti have become an important addition.
I must confess that I have not yet perfected the art of making biscotti. I will readily admit that these biscotti taste pretty good. At the same time, I am still working to fine-tune the exact baking science associated with these delightful treats.
Biscotti is derived from the Latin term meaning "twice-baked." This was a term applied to oven-baked goods that were, indeed, twice-baked and could, therefore, be stored for longer periods of time. Twice-baked breads were allegedly a staple of the Roman legions
Gingerbread, in its broadest sense, refers to a range of baked goods flavored with ginger and sweetened with honey, sugar, or molasses. Gingerbread baking is believed to have developed in continental Europe just before 1000 AD. As Europeans settled in North America, they brought their gingerbread recipes with them. An early American cookbook from the 1790s reportedly has seven different recipes for gingerbread!
These gingerbread biscotti are sweetened with molasses. I like using this partially dried ginger in my biscotti for both the flavor and a little added texture and interest.
Here's how to bake these biscotti:
Ingredients:
1/2 cup butter (I've only used real butter so I can't speak to how margarine might work)
1/2 cup sugar
1/2 cup packed brown sugar
1 1/2 tbsp lightly dried ginger
3/4 tsp cinnamon
1/2 tsp nutmeg
1/4 tsp cloves
2 eggs
3 tbsp molasses
2 1/2 cups flour
2 tsp baking powder
1/2 cup sliced almonds (optional)
white chocolate for dipping (optional)

Here's the sequence for mixing the ingredients:
1. Cream the butter and both types of sugar together. 
2. Beat in the ginger, cinnamon, nutmeg, and cloves. 
3. Beat in the eggs and molasses.
4. Fold in the flour and baking powder. 
5. Fold in the almonds.

Now it's time to prepare the dough for baking. The first bake is the trickier of the two. The goal is to bake all the way through much like a cake. This actually is much easier said than done. I am going to demonstrate the technique in two ways - first of all by dividing the dough in half and the second by dividing the dough in quarters. 
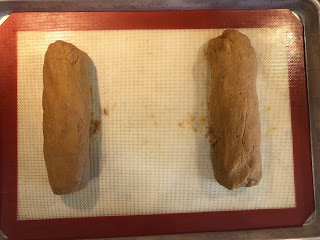
Here is the typical approach in which you divide the dough in two portions. I start by shaping the dough into logs. (Baking hint: instead of using a non-stick spray or parchment paper, I use a silicone baking mat. These are a great investment.)
I then flatten the dough out. I also try to square up the ends as much as possible. This will support slicing the biscotti after the initial bake.
Bake in a 350 degree oven for at least 25 minutes. Be prepared to add additional baking time. The tops should crack somewhat as shown below. The tops should also feel somewhat springy, indicating that the dough has baked all the way through, much like a cake.

After baking is complete, allow the baked logs to cool for about 15 minutes. After they have cooled, cut into 1/2 inch slices with a serrated knife. Place them cut side down on a baking sheet. Here is a picture of mine before they went back in the oven. The sheet includes the slices from both logs.
If you look closely, you can see some darker horizontal lines through them that indicate areas that weren't fully baked through (remember how I said this first bake is easier said than done).
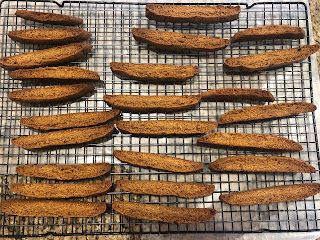
Reduce the oven heat to 325 degrees. With this lower temperature, your goal is going to be to dry out the biscotti. For the baking process, bake for about 9 minutes on the first side. Flip them over and bake for another 5-7 minutes or so. After each baking session, I will also hold my hand over the biscotti to get a little sense of the overall residual moisture content. You may need to repeat the flipping and baking another time or two. Here is a picture of the completed biscotti cooling on the wire rack after the drying process was complete.

For my second batch of biscotti, I stirred in some sliced almonds and divided the dough into quarters rather than in half to have smaller portions for the first bake. I still just placed two logs on each baking sheet during the first baking process. You can see how these were a bit narrower as they went into the oven for the first bake.
Here they are going in the oven for the second bake. You can see that most of these were baked through a little more thoroughly than the initial batch. 
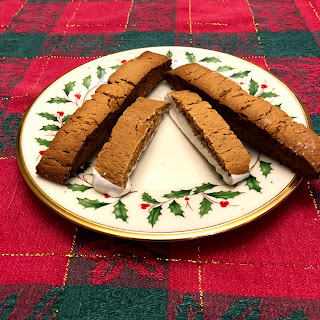
We elected to dip the bottoms of the smaller biscotti in white chocolate. The mechanics of doing the dipping using our chocolate dipping machine was easier with the smaller ones so that drove our decision. Here's a picture of our end results.