Tuesday, June 30, 2015

Sewing sunshine …


The month of June coming to a close typically marks the beginning of the season of intense, dry heat here in the Intermountain West. This year is no exception. Even in the face of the increasing temperatures over the past week, we were trying to avoid turning the air conditioner on until July 1. As the temperatures flirted with the triple-digit mark this past Sunday, however, that plan was abandoned. To our dismay, we found that the air conditioner wasn't working. After a rather hot and sleepless Sunday night, Monday saw us with a functional air conditioner once again and at much less cost than we had feared.

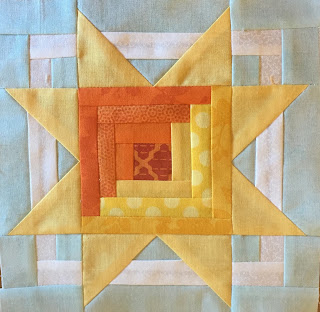
I thought it only fitting to use this blog to showcase a quilt block row that features a sun pattern. This pattern is titled "Sizzlin' Summer and was designed by Quilted Works in St. George, Utah, for the 2014 Row by Row Experience. For those of you unfamiliar with the Row by Row Experience, it is a quilting event that began in New York state in 2011 with 20 quilt shops. The event has grown each year. This year, shops from all 50 states and a number of Canadian provinces are participating.

The Row by Row experience runs through the summer months of each year. Each participating quilt shop designs a "row" based on a given theme. Last year's theme was "Seasons." This year's theme is "H20." The quilt shops give the pattern for the row away for free. Many of the shops also will sell a kit containing the fabrics necessary to make the row (of course, you can always use your own). The goal for the participants is to collect the different rows and create a quilt using the rows. The first person to bring a quilt containing at least 8 different rows to a participating shop wins a prize. I'm still working on the rows that I collected during the summer of 2014. I do have to admit that I saw a row featuring an orca whale from a shop in Everett, Washington, that is inspiring me to consider a road trip.

Back to the sun blocks …
This particular pattern combines some familiar traditional piecing techniques to create the block. The sun is essentially sawtooth star block. The center is completed as a mini log cabin block using orange and yellow fabrics.
The points are created as flying geese. You can also note that the "geese" part of the block was created with strips of fabric rather than a single solid piece. In the completed block, this adds an additional border.
The four completed blocks can then be sewn together with sashing strips to create the row. Note how the blocks are rotated within the row.
At this point in time, I honestly don't have a specific plan for this row. To me, that's part of the fun of collecting these row patterns. I'm having fun seeing the different patterns that the participating shops create. I'm also having fun learning some new techniques along the way.  As I have the opportunity to create new rows, I'm anticipating that the inspiration for putting them together into a quilt will come.

I'm going to close out this post by changing from "Sewing Sunshine" to "Sowing Sonshine." Much like the rays of the summer sun, the cares and struggles of the world can also feel oppressive and tiresome. Even in the midst of these cares and struggles, we as believers are still called to be salt and light to our world - that is, sowing Christ's love. I tend to be someone who can get distracted by the task at hand or discouraged by circumstances that I too easily neglect my responsibility to reflect Christ's love to those around me. It is even in those circumstances that we have the opportunity to do good. Paul's letter to the Galatians provides words of encouragement to continue "sowing Sonshine" regardless of circumstances …
"And let us not lose heart in doing good, for in due time we shall reap if we do not grow weary. So then, while we have opportunity, let us do good to all men, ad especially to those who are of the household of the faith." Galatians 6:9-10
Friday, June 12, 2015

Bring on Barbecue Season …

For those of you who have spent much time around us, you know that we enjoy grilling. Although we do tend to use our grill on a year-round basis, we also enjoy the summer months as an opportunity to try out new grilling recipes. This includes recipes for side dishes to accompany what we cook on the grill.
For good or for bad, we do enjoy beans as a side dish. I will let you decide for yourself what that may or may not say about our family. I promise not to be offended by your assessment. A couple of years ago, I tried my hand at traditional Boston baked beans. These make a great side, especially for a traditional barbecue with hamburgers and hot dogs. 
This year, I wanted to try my hand at a recipe that had more of a Southwestern flair. Last year, we purchased a smoker and have enjoyed using it for beef brisket or a pork roast. My goal was to find a recipe that would complement smoked meat and have a bit of spice as well. The recipe that I am sharing through this post uses pinto beans and is actually a compilation of multiple recipes that I found while searching the web.

Pinto beans are regarded as the most popular bean in the United States and northwestern Mexico. The Spanish word for pinto beans is frijol pinto, which means "speckled bean." The skin of the bean loses its speckled appearance once it is cooked. In areas where meat is sparse, pinto beans are often served with rice and cornbread. Together, the amino acids present in these foods provide a complete source of protein.
To soak or not to soak …
Until I tried this recipe (or rather conglomeration of recipes that became my own recipe), I had always soaked dry beans. If time allowed, I would do the overnight soak in cold water. If I found myself in a rush, I would go with a quick soak by bringing the water to a boil. I noticed that several of the recipes that I had looked at didn't call for soaking the beans. I even found an LA Times article in which the author described his efforts in preparing three batches of beans - one using an overnight soak, one using a quick soak, and one without soaking. His assessment was that the non-soaked beans, while taking longer to cook, had better flavor. The Pioneer Woman, Ree Drummond, also claims not to soak her beans. So, I decided to go with the no-soak approach. I will caution you that the beans will take longer to cook so you do need to allow for several hours of simmering.

Here are the ingredients and instructions (If you want fewer beans, feel free to cut the amounts in half). This recipe fed us for days!:

  • Wash and sort 2 pounds of dry pinto beans. Place them in a large cooking pot and add enough water to cover the beans. At this point, you can turn on the heat and bring the beans to a boil. Once the beans are boiling, turn down the heat so that they continue to simmer. Based on my experience with this recipe, the next time I make these beans, I will probably let them simmer for about an hour before adding the rest of the  ingredients. Probably not a big deal either way, but this is my observation after the first attempt.


Add the following ingredients to the beans:
  • 1-2 cups brisket burnt ends or smoked sirloin. We used smoked sirloin since we could prepare it rather quickly to add to the beans. Shred up the meat into small pieces and add it to the beans and water. Its main role is to add a smoky taste to the beans.


  • 1 quart canned tomatoes. We used a quart of our home-canned tomatoes. Feel free to substitute a 30-ounce can of store-bought canned tomatoes
  • 1 large sweet onion, chopped


  • 1 cup barbecue sauce - my recommendation here is to use a more "traditional" style barbecue sauce and to avoid those with more distinctive, unusual flavors. The purpose here is really to add to the flavor of the beans so you want something that will easily blend in with the other ingredients. I chose to use 1/2 cup each of two different sauces.


  • 3 tablespoons of minced garlic (feel free to use more or less based on your preferences). As I've mentioned before, we buy a jar of minced garlic to have on hand in the refrigerator. We just spoon in what looks about right to us.
  • 1-2 jalapeno peppers, seeded and very finely chopped - decide for yourself how much added "kick" you want. For 2 lbs of beans, about 1 1/2 medium-sized peppers works for us. We wanted a little zing but not to be overwhelmed with heat from the jalapeƱos.
  • 1 tablespoon chili powder - I used a chipotle chili powder that I purchased in Sante Fe. It packs a little extra "heat" and also has a great smoky flavor to it. Again, the goal is some added flavor without overwhelming the beans.
  • 1 tablespoon Worcestershire sauce
  • 1 teaspoon cumin
  • 1 teaspoon salt - this is a good starting point for the salt. Adjust as needed.

Add additional liquid as needed during the cooking process. We used close to 2 quarts of tomato juice. Water would probably be fine as well. We decided to go with the added flavor of the tomato juice. We also have plenty of jars of tomato juice on hand in our cold storage room.
Be careful to stir the beans at about 15 minute intervals as they are cooking. You will find that the beans will settle to the bottom of the pot even if it appears that you have adequate liquid on top. Keep your additional source of liquid close at hand, and continue to add more as needed throughout the cooking process. Anticipate at least 3 hours of total cooking time.

Dinner is served!