Wednesday, April 30, 2014

Contemplating Projects

For those of us who enjoy sewing and quilting projects, acquiring fabric can be as much of an art as the process of piecing and sewing it together. No matter how many projects we are working on at the present, we always seem to be able to justify the purchase of more fabric - often for some yet-to-be-determined project. The cartoon below provides a rather clever illustration of this practice.
Earlier this month, I need to confess that I acquired fabric in contemplation of some future project. I had a meeting in Seattle, and used the handy-dandy quilt shop finder app on my iPhone to locate quilt shops in the area. Fortunately I was able to locate a shop, Undercover Quilts, within walking distance of my hotel. This is a somewhat small shop, tucked away in the famous Pike Street Market, but I very much enjoyed the feeling of being in a local shop, visiting with the owners, and browsing the fabrics and patterns unique to the shop and the Pacific Northwest, in general.
I picked up a pattern and kit that was designed by one of the shop owners. I love polar bears and am becoming more adept with machine appliqué, so this seemed an appropriate kit to try. I will post pictures when I finish it.
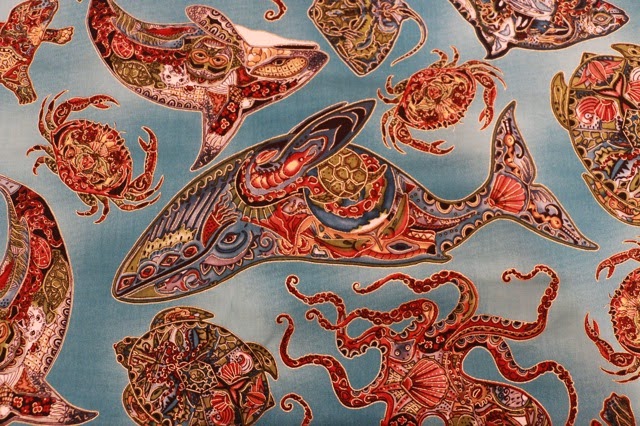
The fabrics that particularly caught my eye, however, were these beautiful ones, designed by a Seattle-area artist, featuring wildlife of the Pacific Northwest. The artist has done a beautiful job of incorporating native art styles into the outlines of the sea-based and land-based wildlife.
Although I only lived in Alaska for a very short time, I do have images of the totem poles and other native art and am still very much fascinated by them. It's hard to say which of these images I like the best, so I will go ahead and share pictures of the wildlife featured in these fabrics.

The challenging part now is going to be to determine how to combine and arrange these  fabrics into a quilt that showcases their beauty. At the present, the fabrics are already amazing and beautiful, however, their full potential of being placed into a larger project that can be used for decoration or warmth (or possibly both) has not been realized.
As I contemplate what that future larger project might be, I also find myself reflecting on my own state as a project in the works. In his final book of the Chronicles of Narnia series, The Last Battle, C. S. Lewis penned a chapter titled "Farewell to the Shadowlands" in which the characters come to realize that their lives in this present world had been only a shadow of the greater "real" world that they were experiencing as they followed Aslan "further up and further in."
Even so, our lives are yet an image of what is to be experienced in heaven. In his first letter to the Corinthians, Paul likens this present world to an incomplete image seen in a mirror. He also gives instruction as to what our conduct should be as we look ahead to the complete reality to come.
For now we see in a mirror dimly, but then face to face; now I know in part, but then I will know fully just as I also have been fully know. But now faith, hope, love, abide these three; but the greatest of these is love.       1 Corinthians 13:12-13

Saturday, April 19, 2014

Easter Cake

Truth be told, I typically prefer pies or cookies to cake. This cake, however, has become one of my favorites through the years. I call it "Easter Cake" because I usually only make it once a year, at Easter. It often doubles as my sister's birthday cake given that her birthday often falls near Easter. 
The yellow cake base itself can be made either from scratch or from a box. My preference is to do my baking from scratch - to me, the cake just tastes better that way. Here is the recipe that I use for the cake.
Cake:
2 cups all-purpose flour
1 1/2 cups sugar
1/2 cup shortening
1 cup milk
3 1/2 tsp baking powder
1 tsp salt
1 tsp vanilla
3 eggs
Preheat oven to 350º. Grease and flour or spray with nonfat cooking spray a 13 x 9 x 2 inch oblong pan. Beat all ingredients on low speed, scraping bowl constantly for 30 seconds. Beat on high speed, scraping bowl frequently for 3 minutes. Pour into pan. Bake for 40 to 45 minutes until toothpick inserted into center comes out clean.
Even though I can bake a cake that tastes good, I don't always bake a cake that comes out of the oven looking pretty as you can see in the photo below. Fortunately, this Easter Cake features a number of very tasty toppings that cover a multitude of flaws.
While the cake is baking, you can begin preparing the first topping. This one is a layer of crushed pineapple. Boil together the following two ingredients until thick and syrupy, about 20 minutes.
  • 1 can (20 oz) crushed pineapple, including its own juice
  • 3/4 cup sugar
While the cake is still warm, poke holes across the top of the cake at about 1-inch intervals. 
Pour the pineapple mixture over cake and spread evenly. Allow the cake to cool completely.
After the cake has cooled, mix together:
  • 2 packages (3 1/2 oz each) instant vanilla pudding mix
  • 3 cups milk
Note that the amount of milk for this step is less than what you would use if you were preparing the pudding per the box directions. This smaller volume of milk will result in a thicker pudding topping for the cake. Spread it over the top of the cake.
The next step is to prepare the whipped cream topping. If you wish, you can use Cool Whip. If you are like me, the superior taste of real whipped cream is worth the extra cost and effort. You will need the following ingredients:
  • 1 cup heavy or whipping cream
  • 1/4 cup powdered sugar
  • 1 tsp vanilla
Beat the whipping cream until soft peaks form. Add powdered sugar and vanilla; continue beating until stiff. Spread over cake. Refrigerate overnight.

Before serving the cake, sprinkle with 3/4 cup of toasted coconut. I like to use a "shortcut" and "toast" the coconut in the microwave. I use a microwave safe container (typically a plastic one), and toast the coconut for about 2 minutes, pausing every 20-30 seconds to stir the coconut and prevent it from burning. Here is how the coconut turns out, followed by a picture of the completed cake.


In celebration of the Easter season, here is a song that celebrates the glorious resurrection day! Easter blessings to you all!

Monday, March 31, 2014

Seeing Red

About ten months ago, I joined a "block of the month" project. As you will see from the pictures, this project has kept me "seeing red" in the literal sense.

Although I've been intrigued by different block of the month projects in the past, this was the first time that I have actually joined one. This particular project is titled, "Saturday Soiree," and features reproduction fabrics from Marcus Brothers from their Gallery and Red and Blue collection. As you may have just surmised, this project can be completed using either red or blue fabrics. Given that I am a 3-time graduate of the University of Utah, I didn't have to think twice about selecting the red option.

For those of you who may not be familiar with block of the month projects, most support the quilter in completing one quilt block each month with the goal of having a set of completed quilt blocks that can be assembled into a completed quilt at the close of the year. Since I began this project last June, I have enjoyed receiving each month's block kit and instructions. The red colors are really quite stunning and feature high contrast between the red and the white. Here are a few examples of the blocks that I have completed.


Now comes the tricky part with block of the month projects. Remember the part about having a set of completed quilt blocks? Just because you finish the year with 12 completed quilt blocks, that doesn't mean that your quilt is ready to be sewn together. This is where the "finishing kit" comes in. 
Depending on the nature of the project, the finishing kit could include components that are more complex than the 12 feature blocks themselves. In the case of the Saturday Soiree quilt, this is sort of the case. In addition to the feature blocks, the quilt also includes six 12-inch chain blocks, four corner capstone blocks, and ten side triangle blocks for a total of 20 additional blocks to put together. 


Just to keep things interesting, this quilt also features 48 pieced sashing strips featuring red and white squares and triangles. Each sashing strip contains 13 individual pieces. If you do the math correctly, that amounts to a total of 624 individual pieces within these 48 strips. Here is an example of what several hundred patchwork pieces look like along with the layout for an individual sashing strip.


Please don't misunderstand this posting as an expression of frustration at this particular project. Even with all of the hundreds of small pieces, it has been a fun project, and I am looking forward to the finished product. 
In many ways, this particular project is analogous to our life's journey. Although our lives include a number of amazingly stunning "feature blocks," much of life is lived in the day-to-day experience of what can be regarded as "the small stuff." Although the work of assembling the small pieces can feel like drudgery and have us "seeing red" in the figurative sense, these are the components that frame and accentuate the "feature blocks." Often it is easy for us to become so focused on these smaller details that we can miss the larger vision of the end goal. Sometimes, we do well to pause, step back, and get a glimpse of the larger goal to which we are striving.


Over the past few weeks, I have found myself "seeing red" and getting caught up in the frustration of some day-to-day processes that have caused me to feel rather defeated. In the midst of it all, I have been reminded, through God's Word, to remain faithful in those aspects for which I have responsibility. My role is not to encroach outside of my assigned scope but rather to remain faithful and persist in what has been entrusted to me. The following verses from Psalms serve as a reminder:
Love the LORD, all His faithful ones. The LORD protects the loyal, but fully repays the arrogant. Be strong and courageous, all you who hope in the LORD. Psalm 31:23-24

Friday, March 14, 2014

Happy Pi(e) Day!


If you have followed any of my cooking-related posts to date, you probably have garnered that we are a family who likes to eat. You probably also have sensed that we enjoy finding somewhat "quirky" opportunities for preparing different food items. Today, March 14, is one of those days. 

For those of you who are mathematically inclined, you will recognize, March 14, or 3/14, or 3.14 as bearing a resemblance to the numeric expression for pi, which is the ratio of a circle's circumference to its diameter. For those of you who are less mathematically inclined, or just like an excuse to eat, simply add the letter "e" to the end of "pi," and you get Pie Day.

Two years ago, I spent a few days in Columbus, Georgia, in late February. Because we love good down home Southern cooking, we took the advice of friends and had lunch at a place called  Country's Barbecue. While we were there, I was intrigued by an item on the dessert menu called "chocolate chess pie." I had never heard of it before, and we were quite stuffed from the fabulous Southern style barbecue, so we didn't order it. I did, however, resolve to look it up later. I followed through and made my first chocolate chess pie on March 14, 2012. The results were very good so I thought I would share the recipe for this post as well as a few photos from this year's baking efforts.


antique pie chest
The exact history of chess pie is a bit obscure. What is consistent among reports about its origins is that it is a Southern dessert. One report suggests that chess pie may have come from England, and that it may have been served in New England as well as the southern colonies. The origin of the name, "chess pie," is a bit obscure as well. One report suggests that it could have come from the term "pie chest," meaning a cabinet for storing pies. Other reports suggest that the name came about through the slurring of the words, "it's jess pie," when the baker was asked what type of pie it was.

Although I am sharing a recipe for a chocolate chess pie, other chess pies are made without chocolate and actually contain a tablespoon or two of cornmeal. There are actually other variations of chess pies, including lemon, orange, peppermint.

Here is the recipe I used. I hope that you like it.


Chocolate Chess Pie

1 1/2 cups white sugar
3 tablespoons baking cocoa (I use heaping tablespoons and prefer Hershey's Special Dark baking cocoa) - dark chocolate has healthy anti-oxidants, right?
2 eggs
5 ounces (1 small can) evaporated milk
1/4 cup melted butter
1 teaspoon vanilla extract

Directions:

  • Stir the sugar and cocoa together in a medium-sized mixing bowl and set them aside.
  • Beat the eggs together and pour them into the sugar/cocoa mixture
  • Pour in the evaporated milk, melted butter, and vanilla and mix together using a hand mixer
  • Pour into an unbaked 9-inch pie shell and bake at 350 degrees for about 45 minutes or until set. 
Pie Crust
I prefer making my own pie crust simply because it tastes better. I've been using the recipe from the Betty Crocker cookbook for as many years as I can remember. Some secrets I've learned through the years are that chilling your pie crust ingredients makes for a flakier crust. On days when I will be making pies, I typically put a stick of Crisco in the freezer in the morning so that it is thoroughly chilled when it is time to make pie. Here is the recipe for a single 10-inch pie crust.

1/2 cup shortening
1 1/3 cup flour
1 teaspoon salt
3 to 4 tablespoons cold water

Directions:
  • Stir the flour and salt together
  • Cut the shortening into the flour and salt using a pastry blender until the particles are about the size of small peas. I will usually cut up the chilled shortening into chunks to make this process easier. 
  • Sprinkle in the water about a tablespoon at a time, stirring the mixture with a fork until all ingredients are blended and stick together. Be careful not to over handle, or the pie crust will be tough.
  • Roll the pastry out on a floured surface until it meets the dimensions of the pie pan. Fold into fourths and transfer to the pie pan. Unfold and ease it into the pan. (Note: this much easier said than done. I frequently need to repair my pie crusts before pouring in the filling.)
You can serve your chess pie with either ice cream or whipped cream. I prefer to use a dollop of whipping cream (the real stuff, of course) rather than ice cream because the pie is rather sweet and rich all by itself. 

By the way, in case you were wondering,  pie are not square. Pie are round; cake are square. (Sorry, bad, cheesy math joke.)