Saturday, July 30, 2016

Visiting States

I have always enjoyed learning about other places. When I was in my middle elementary school years, I could amuse myself for hours on end with a tablet of tracing paper and a set of encyclopedias. I enjoyed learning about different states and countries, and I particularly enjoyed tracing and coloring the maps. 
When I was in the third grade, I was in a combined class that included all of the third graders and half of the fourth graders. One of the fourth graders' assignments was to write a report on a given state. I decided that I didn't want to be left out and asked my teacher if I could write a state report, too. He agreed, and I was delighted to prepare a report on Alaska, the state where I was born. 
Fast forward nearly 40 years to late 2015. While visiting my local quilt shop, I learned of a Block-of-the-Month pattern that would be released in 2016. This project was a quilt made of fabrics featuring the state flowers of each of the 50 states. I very quickly put my name on the list to be included. 
From January through May 2016, each month I received fabric to make 10 blocks. At the end of May, I was ready to put the quilt together. As you can see from the picture at the top of this posting, this is a HUGE quilt. It measures 86.5 x 102.5 inches, so roughly a queen size quilt. The machine quilting was done by Kerrie Curtis from Utah Valley Quilting who did a great job with an all-over design that complemented the designs of the individual blocks.  
The fabrics used in this quilt featured art deco-style prints. The block pattern is the granny square block, a traditional quilt block pattern that has appeared in many quilts through the years. One of the nice things about this quilt pattern is that it didn't require additional sashing strips. As the blocks were sewn together, the white triangles on the outside edges of the blocks joined together to create full size squares that gave the look of sashing between the blocks. 
I thought I would share a few of the blocks with you. I've selected blocks featuring the state flowers of the states that we recently visited during our family's summer vacation. I'm starting with the Utah sego lily. 
From Utah, we crossed over into Wyoming, whose state flower is the Indian paintbrush.
After a long drive through Wyoming, we crossed over into Nebraska. Their state flower is the goldenrod.
The border between Nebraska and the neighboring state of Iowa is defined by the Missouri River. Iowa's state flower is the wild prairie rose.
After a brief drive through Iowa, we reached Minnesota, home to the lady slipper.
After staying for several days in Minnesota, we needed to head for home. Our journey westward took us to North Dakota, who also selected the wild prairie rose as their state flower.
Our travels also included a few days in South Dakota. South Dakota adopted the pasque flower, also known as the May Day flower as their state flower. From South Dakota, we journeyed back through Wyoming and then home to Utah.
Although this post has featured states as physical locations that can be visited, I would also like to reflect, for a moment or two, on non-geographic states. These "states" may be considered our state of mind, state of the heart, or even our spiritual state. I will readily admit that it is easy for us to allow these "states" to be influenced by our circumstances, including other people, the weather, finances, current challenges, uncertainty within our nation or the world - really about anything. In contemplating these "states," I've found myself reflecting on Paul's words in his letter to the Philippians in which he relates his state of contentment despite the widely disparate circumstances he experienced during his ministry years. Of note, too, Paul penned these words while in prison. Perhaps they, too, will challenge you as you contemplate your own circumstances and the "state" in which you are finding yourself.
Not that I speak from want, for I have learned to be content in whatever circumstances I am. I know how to get along with humble means, and I also know how to live in prosperity; in any and every circumstance I have learned the secret of being filled and going hungry, both of having abundance and suffering need. Philippians 4:11-12

Saturday, July 16, 2016

Roasted Red Pepper Hummus … a great snack made with a pretty cool gadget

As I've shared in a few other posts, during the summer time, we enjoy foods with a Mediterranean or Middle Eastern taste to them. Previous posts have featured tabbouleh as well as a pasta salad that includes Kalamata olives. This month I thought I would write about hummus and how we acquired the kitchen gadget that we find useful in making hummus.
For those of you who may be less familiar with hummus, it is a spread or dip made from chick peas, also known as garbanzo beans. Hummus is actually taken from the Arabic word that means "chick peas." Archeological evidence suggests that chick peas have been part of humans' diets since about 6000 BC. Today, they are grown throughout the Middle East, southern Europe, north Africa, and India. Here is a picture of chick pea plants and pods. Note that the pods typically contain only 1or 2 peas.


In addition to being the main ingredient in hummus, chick peas are used in a number of dishes throughout the world. Chick peas are a nutrient-dense food and a great source of protein, dietary fiber, folate, iron, and phosphorus. Their protein quality is ranked higher than that of many other legumes and cereals so they are a great option for those of you who prefer a vegetarian diet. 
In addition to pureed chick peas, key ingredients in hummus include tahini, lemon juice, and olive oil. Tahini is a paste made of ground sesame seeds. You can generally find it in the ethnic foods section of the grocery store. It can be rather messy to work with, and I will share how I go about measuring it for this recipe. Depending on your tastes, you can add other spices and flavorings such as garlic. 
So, now for the story of how we got ourselves involved in making hummus …
A little over a year ago, my husband was marking his 15th anniversary with his current company. He wasn't going to pick out an anniversary gift, but I encouraged him to look through the catalog anyway. One of the choices was a nice Cuisinart food processor. I reminded him that our daughter enjoyed making smoothies and other similar concoctions during the summer months so it might be a nice choice. At that time, we had also made an attempt at hummus using our tiny food processor. Here is a picture of this gadget. Please excuse the Apple product power supply cables in the background.
Now, for the recipe and instructions for roasted red pepper hummus
2 red bell peppers
2 15-ounce cans of chick peas, drained. Reserve some of the liquid from one of the cans in case you want to add it to thin out the hummus mixture a little.
1/3 cup tahini
1/4 cup lemon juice (you may want to add a little more to taste after you have mixed the ingredients together)
2 tablespoons olive oil
2 teaspoons crushed garlic
salt to taste
sprinkling of cayenne pepper to taste

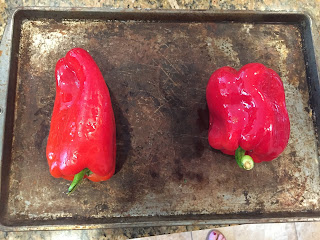
Step 1: Roast the red peppers. This is really the most time consuming part of the process. It's also a bit messy, but the end result is great so hang in there.
Start by brushing the peppers with olive oil, poking a few holes in them and then placing them on a pan under the broiler.
As they broil, you want the outer skin to get nice and charred. Turn them every few minutes so that all of the sides are evenly roasted. When they have finished roasting, they will look something like this.
Place them in a plastic bag and allow them to cool. This cooling process will also allow the skins to loosen. After they are cool enough to handle, peel off the outer skin, cut them open, and remove the seeds. Place the pepper strips in the food processor and puree.
Step 2: Add the chick peas, tahini, lemon juice, olive oil, and garlic to the food processor and puree. Quick tip: here is how I measure the tahini. 
As you can see from this picture, the tahini is pretty oily and can be messy to work with. Often times, the oil will separate from the paste so you will need to stir them together before measuring. I have a long cake frosting spatula that I like to use for this purpose. Because the tahini is so thick, I don't want to bend one of my regular spoons. When I go to measure the 1/3 cup for this recipe, I get out the 1/3 measuring cup so that I can get a visual image of how much it is. I then use the spatula to scoop out the approximate amount and put it right into the food processor so that I don't have a messy measuring cup to deal with.
Step 3: Here is where you add additional seasonings as desired. I often add in another teaspoon or two of lemon juice, some salt, and a sprinkling of cayenne pepper. I don't want to overwhelm the hummus with too much spice, but a little hint of cayenne is nice.
Step 4: Eat and enjoy. You can serve hummus with about anything - flatbread, pita bread, pita chips, vegetables - whatever it is you prefer. 
I've had some complements on this hummus from two Middle Easterners who are rather discriminating in their tastes. I take that to be a good thing, and I hope that you will enjoy this recipe as well.