Saturday, January 30, 2021

A warm skillet meal for winter


Even though COVID-19 keeps us working at home these days, we still appreciate an easy recipe for the work week. If that recipe can generate leftovers, even better. This recipe is one that we have come to enjoy over the past couple of years. It's easy, filling, and features bacon - we all know that bacon makes everything just a little bit better.

With the exception of the pasta that is cooked separately, we prepare this meal in an everyday pan. You can think of an everyday pan as an oversized skillet that is deeper than a typical skillet and may or may not have a long side handle. They come in a variety of sizes and typically have a non-stick surface which makes cooking and clean up easier. Ours is a Calphalon brand and is 13.5 inches in diameter and about 3.5 inches deep. A number of varieties are available along with accompanying reviews so you can decide which might best suit your needs.

This particular dish includes pasta, leeks, and bacon. The choice of pasta is pretty much up to you. The main thing is that you want to select a pasta that is going to hold up well. We've used rigatoni, bowties, and medium shells. I will feature rigatoni in the pictures below.

One of the nice things about this recipe is that it really goes together easily and efficiently. When just three of us are at home, we can get three separate meals (9 total servings) from this recipe. When others are at home and eating, it's a bit of anyone's guess.

Here are the ingredients:

  • 16 ounce package of pasta (suggestions: rigatoni, bowties, medium shells)
  • 6 slices of bacon cut into pieces
  • 2 or 3 large leeks - If you are buying your leeks from the store, 2 or 3 big ones will be sufficient. When I'm using leeks from the garden, I pull a bunch and then eyeball them to estimate the equivalency. At the end of the day, it's really up to you regarding how many leeks you want to include
  • 1 cup heavy cream
  • 1/2 cup grated parmesan cheese
  • Salt
  • Ground black pepper
  • Fresh chopped parsley for garnish
Here are the steps:
  1. Prepare the pasta according to the package directions. Reserve about 1 cup of the pasta water and then drain the pasta.
  2. While the pasta is cooking, prepare the leeks. I like to cut them into thin rings extending up into the green portion of the leek. Depending on the diameter of the leek, I may further cut them into halves or quarters. It's not a perfect science so go with what you like. Set the leeks aside until you are ready to cook them in the bacon grease (yum!)

  3. Cook the bacon in the everyday pan. Once it is nearly finished cooking and you have some accumulated bacon grease, stir in the leeks along with some salt and pepper. Cook until the leeks are soft. You can keep the lid on the skillet as the leeks are cooking to minimize evaporation.

  4. Once the leeks have softened to your satisfaction, turn down the heat and stir in the cream. Stir until the mixture thickens.
  5. Stir in the pasta, parmesan cheese, and enough of the reserved pasta water to loosen the pasta, bacon, and leeks. You're really not out to create a typical sauce. Rather, you don't want everything tightly stuck together. Of course, you can always add in a little extra milk and more water as you wish. 

  6. Season with salt and pepper to taste
  7. Serve with additional grated parmesan cheese and fresh chopped parsley (feel free to substitute dried if you wish).
Note: when rewarming leftovers, anticipate the need to add additional liquid (milk and/or water).

Wednesday, December 23, 2020

O Little Town of Bethlehem

A very blessed Christmas Eve Eve to you all! Despite all the challenges of 2020, Christmas will soon be here. I'm finding comfort in the reality that Christmas can't be hindered. If anything, this year serves as a reminder that, even in difficult circumstances, the good news of Christmas  cannot be diminished. 

In some ways, this piece that I am sharing is, to me, a bit symbolic of the hope of Christmas and a season of perseverance. This particular piece is called, Follow Me to Bethlehem, and is available through Bits and Pieces by Joan. I purchased this piece at least three years ago, possibly longer, eager to add a nativity banner to my Christmas collection. Even though I've completed a number of wool pieces through the years, this is one that had a journey of its own. It also involved some additional steps before proceeding to stitching the individual appliqué pieces in place.

As you can see, the individual pieces are stitched on top of a quilted background. This meant that the first step was getting some backing fabric to go with the flannel background and having it quilted. The next step was cutting the quilted piece to the appropriate dimensions and stitching the binding in place. I then elected to fuse and stitch the stable and palm tree pieces before proceeding to the people and the animals. With the multiple tiny pieces for the hands and faces and then trying to determine which colors in the kit to use for which individual, I let myself get a bit overwhelmed at this stage in the process and turned my attention to other projects. Later this summer, I managed to push through to get all of the figures cut and fused. The project then sat for a few more months until I found myself at a spot in which I couldn't avoid settling down to finish this project any longer. As I set small goals and persisted, I found that I was actually looking forward to spending time on the project. Sooner than expected, I was at a point where I could see that I would actually finish it.

I anticipate that, for many of us, 2020 has been fraught with both seen and unseen challenges. For me, this piece reflecting the story of Christmas, will serve as a tangible reminder of persisting one step at a time, even when it would have been easier to avoid the situation and even during stretches of frustration and inertia. 

My Scripture reading this morning was from the Old Testament book of Micah. Many of us are familiar with Micah 5:2 which tells that the Savior will be born in Bethlehem. This morning, I was particularly struck by the promise and hope in Micah 5:4. A very Merry Christmas to all!

And He will arise and shepherd His flock in the strength of the LORD, in the majesty of the name of the LORD His God. And they will remain, because at that time He will be great to the ends of the earth. Micah 5:4

Sunday, December 13, 2020

Turkey sausage and kale chili

I will readily admit that this sounds a bit unusual and not something that would be at the top of my list to try. This is a recipe we first tried a few years ago - probably looking for something to do with the last of the tomatoes and kale. This recipe has become one that we look forward to pulling out each fall. Given that the predominant colors are red and green, it is also a chili that could work well for dinner during the Christmas season. Please accept my apologies for the Halloween tablecloth in the background. Let's just say that my good intentions for an October food post just didn't happen.
So - a quick word about kale and how we came to preparing recipes that include kale. It's been several years now that we started growing kale in our garden. We use one of our raised beds for the kale crops - cabbage, kale, and collards. We've found that the kale tends to grow quite well, and it is more pest-resistant than the cabbage. Given that we're not exactly part of the kale smoothie brigade, we've needed to find other uses for our kale. In addition this recipe, we have a Portuguese kale, potato, and sausage soup that we enjoy. We've also used some kale in curry dishes.
Before I move on to the recipe, here are a five fun facts about kale, or leaf cabbage. The picture below is of curly kale, which is the type we've been growing in our garden.
  1. Kale originated in the eastern Mediterranean and Asia Minor. It is believed to have been cultivated as early as 2000 BC.
  2. Kale was introduced to the US by Russian traders in the 19th century.
  3. Although kale originated in temperate climates, it is pretty hardy and can survive temperatures as low as 5 degrees Fahrenheit. Just the same, it is typically grown as an annual rather than a perennial.
  4. Kale is a great source of vitamins, including A, C, B6, and folate as well as several dietary minerals including iron, calcium, potassium, and phosphorus. As with most vegetables, the dietary content of these vitamins and minerals decreases with boiling.
  5. Kale is a bit of a comfort food in many European countries and is and commonly served in soups or with potatoes, sausage, and/or bacon. How can anyone go wrong with sausage and bacon?
So, let's get on with the recipe:
1 tbsp olive oil
1 lb spicy turkey sausage (we typically buy a package of 5 large links and then remove the casings)
1 large onion, diced
2 cloves garlic, minced
1 red bell pepper, diced
1/2 tbsp chili powder (feel free to start with less and adjust from there)
1/2 tsp cayenne pepper (see about note with the chili powder)
1 tsp dried oregano
2 tbsp tomato paste
2 cups chopped fresh tomatoes (ok to substitute a 15-ounce can)
1 15-ounce can cannelloni beans
3 cups chicken broth - think of this as a starting volume and adjust from there
1 large bunch kale, chopped into pieces - I am usually going out to the garden to cut what is available and then use my best guess as to whether it looks like what a bunch from the store would be

Steps
  •  In a large heavy-bottomed pot, heat the oil and then saute the onion until it is soft and becoming translucent.
  • Add the turkey sausage and cook until it is cooked through.
  • Stir in the garlic, red pepper, chili powder, cayenne, and oregano. Cook until the peppers are tender, roughly 6-7 minutes. A word about the seasonings - keep in mind this is coming from someone who likes a dish that packs a bit of heat. Don't be afraid to start small. The turkey sausage that we typically use is quite spicy. We also have some New Mexico chili powder that I picked up on a trip a few years back. When we use this particular chili powder, we will typically start with about a third of the amount specified in the recipe. Don't say I didn't warn you. Here's a picture of everything simmering in the pot. We typically make at least a double batch - go big or go home.
  • Stir in the tomato paste and cook for about one minute.
  • Stir in the tomatoes, beans, and chicken broth, and bring to a boil. Here's a picture of the brand of beans we typically use along with a picture of the chili before we stir in the kale.

  • Stir in the kale and simmer until the leaves are tender. Stir in any additional chicken broth to get the chili to the desired consistency.
  • Enjoy with bread or crackers!

Sunday, October 25, 2020

Spooky Days


I haven't written for a while, but decided this might be a good time to start again. Over the past few months, I haven't spent much time at the sewing machine. My sewing has been more focused on handwork and taking advantage of spare bits of time wherever I can catch them. 

Believe it or not, this project caught my eye back in late May. It features fabrics and a pattern designed by a quilter I follow on Instagram, Amanda Niederhauser, aka Jedi Craft Girl. You can check out her website here and also follow her on Instagram. A number of her patterns feature cats, and her posts often feature her Bengal cat, Mufasa.

This fun piece went together quite quickly and now is a nice Halloween accent in my upstairs family room. The project features fabrics from Amanda's Scaredy Cat fabric line that was distributed by Riley Blake designs. The hard part for me was deciding how to arrange the fabric squares to ensure variety and to avoid having the cat or the letters sitting over black squares. I also wanted to keep the pieces that featured a cat's face or a pumpkin in its entirety positioned for visibility. Fortunately, the cat and the letters had been laser cut and pre-fused - always a nice bonus! If you look closely at the pictures below, you might be able to see the blanket stitching outlining the letters and the cat. Of course, black on black can be a bit challenging.


I chose to have the piece quilted using an edge-to-edge bat design. It seemed a fun choice to add to the mix of cats, pumpkins, and bones without being too distracting. If you look closely at the picture of the back, you should get an idea of how the bats are scattered across the design.
I'm certainly not going to argue that 2020 hasn't been filled with spooky days. It's probably fair to say that most of us have grown quite weary of COVID-19 and the prevailing uncertainty that has come with it. Independent of COVID-19, these past few months have brought their own share of discouragement and uncertainty my way. Over the past few weeks, I've been spending some time in the Old Testament books of Isaiah and Jeremiah. While a major theme of each of these books is the coming and then actual judgment on the nations of Israel and Judah, God never leaves His people without hope. Even though the time of judgment came, it would not last forever. This particular verse from Isaiah has been a source of hope and comfort to me over the past few weeks, and I hope you will find it meaningful as well.
I will lead the blind by a way they did not know;
I will guide them on paths they have not known.
I will turn darkness to light in front of them
and rough places into level ground.
This is what I will do for the,
and I will not forsake them. Isaiah 42:16 (HCSB)

Wednesday, July 1, 2020

Pondering Poutine


It's been a while since I've last written. Certainly these past few months have been a bit intense, and I've found myself with some consistently long workdays with limited time for anything other than academic or work-related writing.
Given that today marks the start of a new month, it seems as good a time as any to write again. Many of you are already aware of our quirks and the ability to turn about any holiday into a food-related event. Today we give a shout out to our neighbors to the north - Canada. July 1 is Canada Day. Canada Day commemorates the Constitution Act, 1867, which united the Province of Canada, Nova Scotia, and New Brunswick into a single dominion within the British Empire. Canadians typically celebrate Canada Day with fireworks, parades, concerts, and barbecues. We thought that we would create our own Canada Day celebration with poutine for dinner.

For those of you who are not familiar with poutine, it is essentially cheese curd and gravy over fries. Think of it as a Canadian version of chili cheese fries. I'm not totally sure as to whether poutine is a routine part of Canada Day celebrations, but I can say that it has become one our favorite Canadian foods. I first became aware of poutine in 2010 during the Vancouver Olympics - most likely through some type of televised special feature. When my travels took me to Montreal later in 2010, I sought out the opportunity to try some poutine for myself. Let's just say that I continue to seek out good spots for poutine whenever I am in Canada, and we've worked to refine some of our own skills.
If poutine is really just fries, cheese curd, and gravy, what skills might one need to create great poutine? Here are a few pointers that we have picked up through making our own poutine and experiencing poutine at other locations.
1. The cheese - Really, it's your own preference for type of cheese curd. We tend to prefer white cheddar cheese.
2. The gravy - Most poutines feature a beef broth-based gravy. I will share how we prepared ours a little later.
3. The fries - Most poutines will include a thicker cut fry. It's up to you whether you bake or deep fry them. For today's poutine, we went with the deep fryer. 
4. The extras - This is where you can get creative with what you feel may complement the cheese and gravy. I've seen variations that include bacon, Philly-style beef, as well as sautéed peppers and onions. 

Here are a few of our favorite locations in Canada for acquiring poutine. Hopefully, we will have a chance to visit them again.
  • La Belle Patate - locations in Victoria and Vancouver. We've been to the one in Victoria which is a bit out of the way from the main part of town. If you aren't paying attention, you might miss this location. They have multiple varieties of poutine including La Belle Special and Meat Lovers.
  • The Pink Bicycle - yes, that's really the name of the place. It is also located in Victoria. Their Pink Bike Poutine has a pretty amazing rosemary gravy.
  • Eddie Burger Bar - this spot is in Banff. My husband had a trip to Banff a few years ago, and I looked up places for poutine. He ordered a burger and poutine and decided that the burger was pretty amazing, until he tried the poutine. I'm hoping to visit this spot myself.
  • Montreal Poutine - I'm fairly certain this is the place I visited in Montreal. The pictures of the outside seating look very familiar and the location on the map is about right. This place is located in the old part of the city. 
I wish I could take credit for tonight's cooking, but my husband took over while I was in a Zoom meeting. I did have him take some pictures to document the process.
Creating the Gravy:
Step 1: Saute some bell pepper and onion (the onion was from our garden
Step 2: Assemble the other necessary ingredients
  • Make a roux with about 1 stick of butter and 1/4 cup flour. Stir in 20 ounces of beef broth and 10 ounces of chicken broth (yes, really). Season with some salt and stir in the sautéed onions and peppers. your gravy will look something like this:
Step 3: Prepare the fries. As I mentioned, we elected to use the deep fryer
Step 4: Assemble the poutine. Put some fries in a bowl, stir in a little gravy. Add a few more fries and some cheese curd. Add a little more gravy and eat!

Tuesday, December 31, 2019

Welcoming the New Year … with wool

A very happy last day of 2019 to all. I hope that you have been enjoying a wonderful and blessed holiday season. I had very grand intentions of a Christmas-themed post featuring a quilt I completed a few years ago. The time got the better of me, so this will be just a short post to highlight a recently completed project for January and to provide a sneak preview of the beginnings of a 2020 project.
This past summer, my local quilt shop began the Buttermilk Basin "Welcome Home" wall hanging as a block-of-the-month project. It had been a while since I had taken on a weekly or monthly series, so I decided to give this one a go. I try to be pretty selective with any series such as this one that I pursue. While I do have more than my fair share of UFOs sitting in my sewing room, I don't like to acquire blocks associated with a series only to have them sit in an unfinished pile.

As you can see from these two pictures, the project features a quilted banner and then each month's circle fits into the "O" in HOME. The photo at the start of this post features the January circle. I was delighted to see the snowman and cardinal included in this design. I'm one who waits until after Christmas to put up some of my snowman decorations. I always feel like I need something to fill the void after the Christmas decorations come down. In case you are interested, here is a link to my snowman quilt post from a few years ago. I've also included a close up of the "H" in the banner so that you can see some of the embroidered embellishment down the left edge of the letters.
Here's a quick sneak peek at what is likely to be in store for my 2020 stitching. I wrote previously about stitching wool projects on my flights to and from France in October. In honor of that trip to France, my daughter bought me this Joyeux Noel block from Buttermilk Basin. This is the first block in the series, and I'm not sure yet how many to anticipate. I guess we will find out. At any rate, I wanted to get the fusing done before my daughter goes back to college so that she could get a better look.
I hope that you will all have a wonderful 2020. I've told my husband that I want us to make a list of 20 things to do together in the new year. Two that are already on our list are 1) a hike to go see wildflowers when they are in bloom and 2) going snowshoeing. My goal is to get our list made by the end of the day January 1 so that we can be intentional about making plans.
On the topic of making plans, I do enjoy the opportunity each December 31/January 1 to reflect on the past year and to contemplate the coming  year. A few days ago, I was sorting through some past sermon notes dated December 30, 2007. These included a reminder of the choices that do lie before us. While many of us will likely encounter at least some circumstances that are beyond our control, more often than not, the choices that we can control largely influence our circumstances. As I close with these words spoken by Moses as the children of Israel were about to enter the Promised Land, consider how you will respond to the choices that you encounter in the coming year. Happy New Year!
I call heaven and earth to witness against you today, that I have set before you life and death, the blessing and the curse. So choose life in order that you may live, you and your descendants, by loving the LORD your God, by obeying His voice, and by holding fast to Him; for this is your life and the length of your days, that you may live in the land which the LORD swore to your fathers, to Abraham, Isaac, and Jacob, to give to them. Deuteronomy 30:19-20.

Thursday, December 19, 2019

Gingerbread Biscotti

Baking is one of my favorite Christmastime activities. While I enjoy pulling out traditional family recipes, I also enjoy the opportunity to add another treat to my repertoire of recipes. In recent years, gingerbread biscotti have become an important addition.
I must confess that I have not yet perfected the art of making biscotti. I will readily admit that these biscotti taste pretty good. At the same time, I am still working to fine-tune the exact baking science associated with these delightful treats.
Biscotti is derived from the Latin term meaning "twice-baked." This was a term applied to oven-baked goods that were, indeed, twice-baked and could, therefore, be stored for longer periods of time. Twice-baked breads were allegedly a staple of the Roman legions
Gingerbread, in its broadest sense, refers to a range of baked goods flavored with ginger and sweetened with honey, sugar, or molasses. Gingerbread baking is believed to have developed in continental Europe just before 1000 AD. As Europeans settled in North America, they brought their gingerbread recipes with them. An early American cookbook from the 1790s reportedly has seven different recipes for gingerbread!
These gingerbread biscotti are sweetened with molasses. I like using this partially dried ginger in my biscotti for both the flavor and a little added texture and interest.
Here's how to bake these biscotti:
Ingredients:
1/2 cup butter (I've only used real butter so I can't speak to how margarine might work)
1/2 cup sugar
1/2 cup packed brown sugar
1 1/2 tbsp lightly dried ginger
3/4 tsp cinnamon
1/2 tsp nutmeg
1/4 tsp cloves
2 eggs
3 tbsp molasses
2 1/2 cups flour
2 tsp baking powder
1/2 cup sliced almonds (optional)
white chocolate for dipping (optional)

Here's the sequence for mixing the ingredients:
1. Cream the butter and both types of sugar together. 
2. Beat in the ginger, cinnamon, nutmeg, and cloves. 
3. Beat in the eggs and molasses.
4. Fold in the flour and baking powder. 
5. Fold in the almonds.

Now it's time to prepare the dough for baking. The first bake is the trickier of the two. The goal is to bake all the way through much like a cake. This actually is much easier said than done. I am going to demonstrate the technique in two ways - first of all by dividing the dough in half and the second by dividing the dough in quarters. 
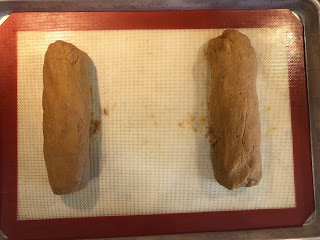
Here is the typical approach in which you divide the dough in two portions. I start by shaping the dough into logs. (Baking hint: instead of using a non-stick spray or parchment paper, I use a silicone baking mat. These are a great investment.)
I then flatten the dough out. I also try to square up the ends as much as possible. This will support slicing the biscotti after the initial bake.
Bake in a 350 degree oven for at least 25 minutes. Be prepared to add additional baking time. The tops should crack somewhat as shown below. The tops should also feel somewhat springy, indicating that the dough has baked all the way through, much like a cake.

After baking is complete, allow the baked logs to cool for about 15 minutes. After they have cooled, cut into 1/2 inch slices with a serrated knife. Place them cut side down on a baking sheet. Here is a picture of mine before they went back in the oven. The sheet includes the slices from both logs.
If you look closely, you can see some darker horizontal lines through them that indicate areas that weren't fully baked through (remember how I said this first bake is easier said than done).
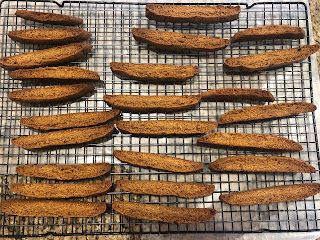
Reduce the oven heat to 325 degrees. With this lower temperature, your goal is going to be to dry out the biscotti. For the baking process, bake for about 9 minutes on the first side. Flip them over and bake for another 5-7 minutes or so. After each baking session, I will also hold my hand over the biscotti to get a little sense of the overall residual moisture content. You may need to repeat the flipping and baking another time or two. Here is a picture of the completed biscotti cooling on the wire rack after the drying process was complete.

For my second batch of biscotti, I stirred in some sliced almonds and divided the dough into quarters rather than in half to have smaller portions for the first bake. I still just placed two logs on each baking sheet during the first baking process. You can see how these were a bit narrower as they went into the oven for the first bake.
Here they are going in the oven for the second bake. You can see that most of these were baked through a little more thoroughly than the initial batch. 
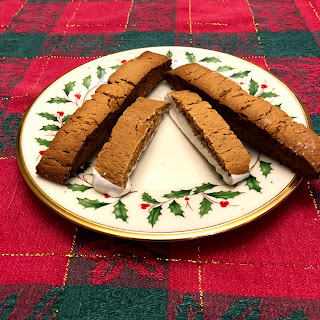
We elected to dip the bottoms of the smaller biscotti in white chocolate. The mechanics of doing the dipping using our chocolate dipping machine was easier with the smaller ones so that drove our decision. Here's a picture of our end results.