Monday, May 25, 2015

More Block Testing …

Back in November, I shared some of my experiences as a quilt block tester. Quiltmaker magazine has just released volume 11 of their 100 blocks magazine. I once again served as a block tester. This post features the 14 different blocks that I tested. I'm also sharing links to the designers' web pages so that you can check out more of their work. 
The block at the top is my favorite of this group. It is titled "Snow Cat" and was designed by Jennifer Ball. The cat is cut from wool felt, and I liked the black background that gave the appearance of a nighttime snowfall.
This time around, I had a number of appliqué blocks to test. Continuing with the animal/pet theme, the block on the left was titled "Across My Heart" and was designed by Amy Rullkoeter who is a contributing editor for Quiltmaker magazine. The block on the right was titled "Hang Ten" and was designed by Margie Ullery of Ribbon Candy Quilt Company. Margie was one of the teachers on the Alaskan quilting cruise I took last June and designed the quilts featured in Sewing at Sea Part II. On a fun note, I received this block to test right after I had returned from a meeting in Maui.

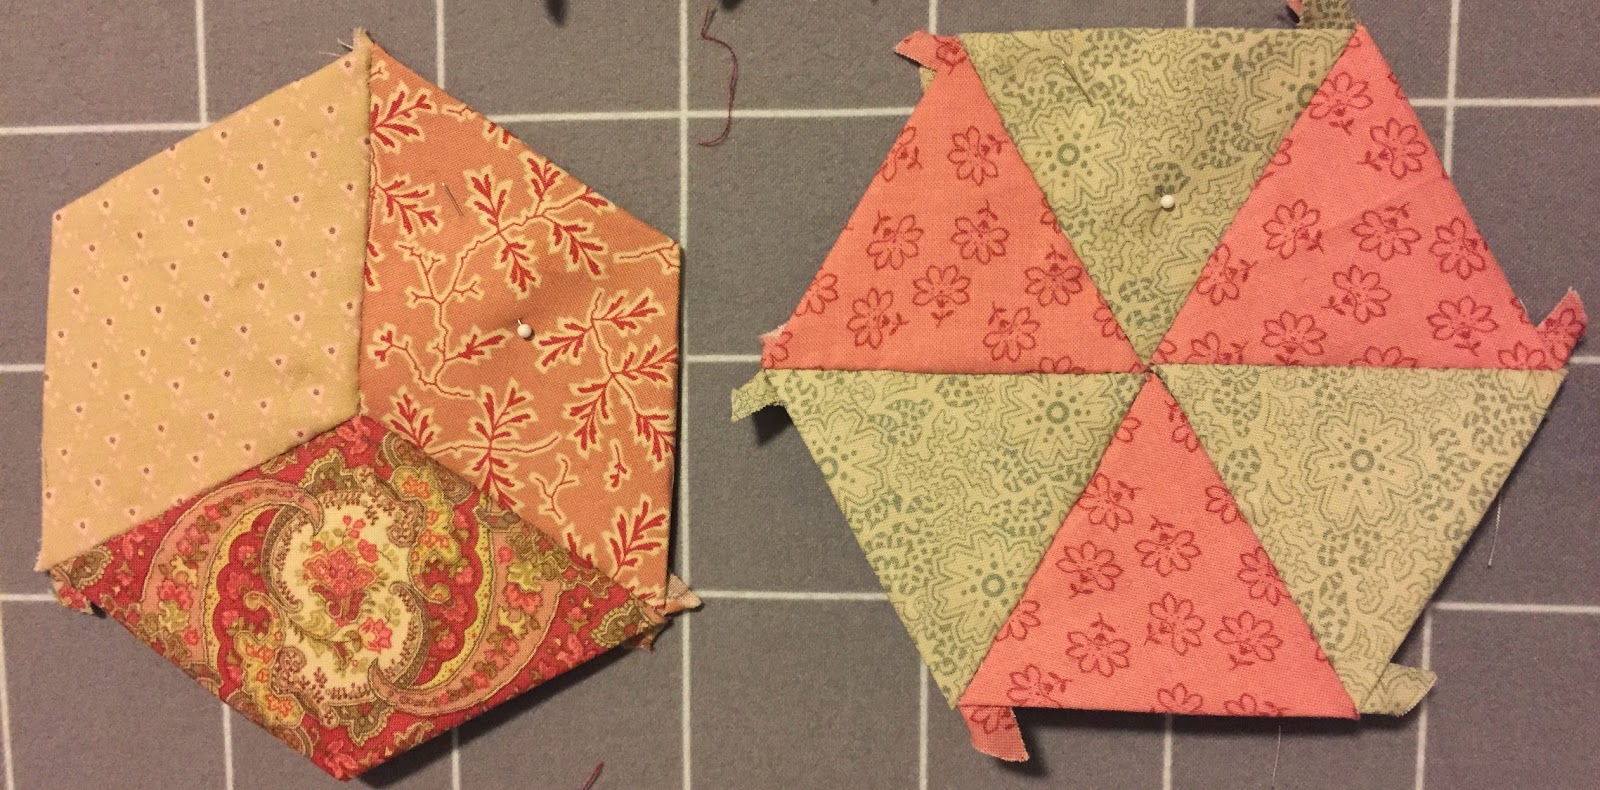
These next two blocks have more of a floral theme to them. The one on the left is titled Sun Shower and was designed by Beth Helfter. The one on the right was simply titled "Whimsy" and was designed by Karen Comstock of Quiltricks.
 Continuing with the floral theme, this next block is titled "Hexadaisy" and was designed by Emily Breclaw. This block features 42 paper-pieced shapes, and was the most time-consuming of the blocks that I tested. For this one, I needed to trace and cut all of the paper templates, cut and baste the fabrics to the templates, stitch the individual pieces together and then blind stitch them to the background. 
I also continued to expand my paper-piecing skills. This block was my favorite of the paper-pieced ones. It is titled Basket Star and was designed by Marjorie Rhine. I liked the way that the batik fabrics worked together.
The anchor block on the left was probably the most challenging block to piece with its multiple individual pieces and paper-pieced units to put together. It is titled "By the Sea" and was designed by Barbara Cain. The kite on the right was a great way to use up multiple small scraps. It is titled A Kite's Tale and was designed by Nova Birchfield. I tried out one of the decorative stitches on my machine to create the kite string.

This final paper-pieced block provided another fun way to use up scraps and to combine them in a fun way. I liked the opportunity to mix and match different shades as well as fabric styles within the block. It is titled Scrappy Strippy Kisses and was designed by Heather Kojan.
I also had a few traditional pieced blocks to test. The one on the left is titled Sparkler and was designed by Donna Benham. The one on the right is titled Capital Square and was designed by Kari Carr.


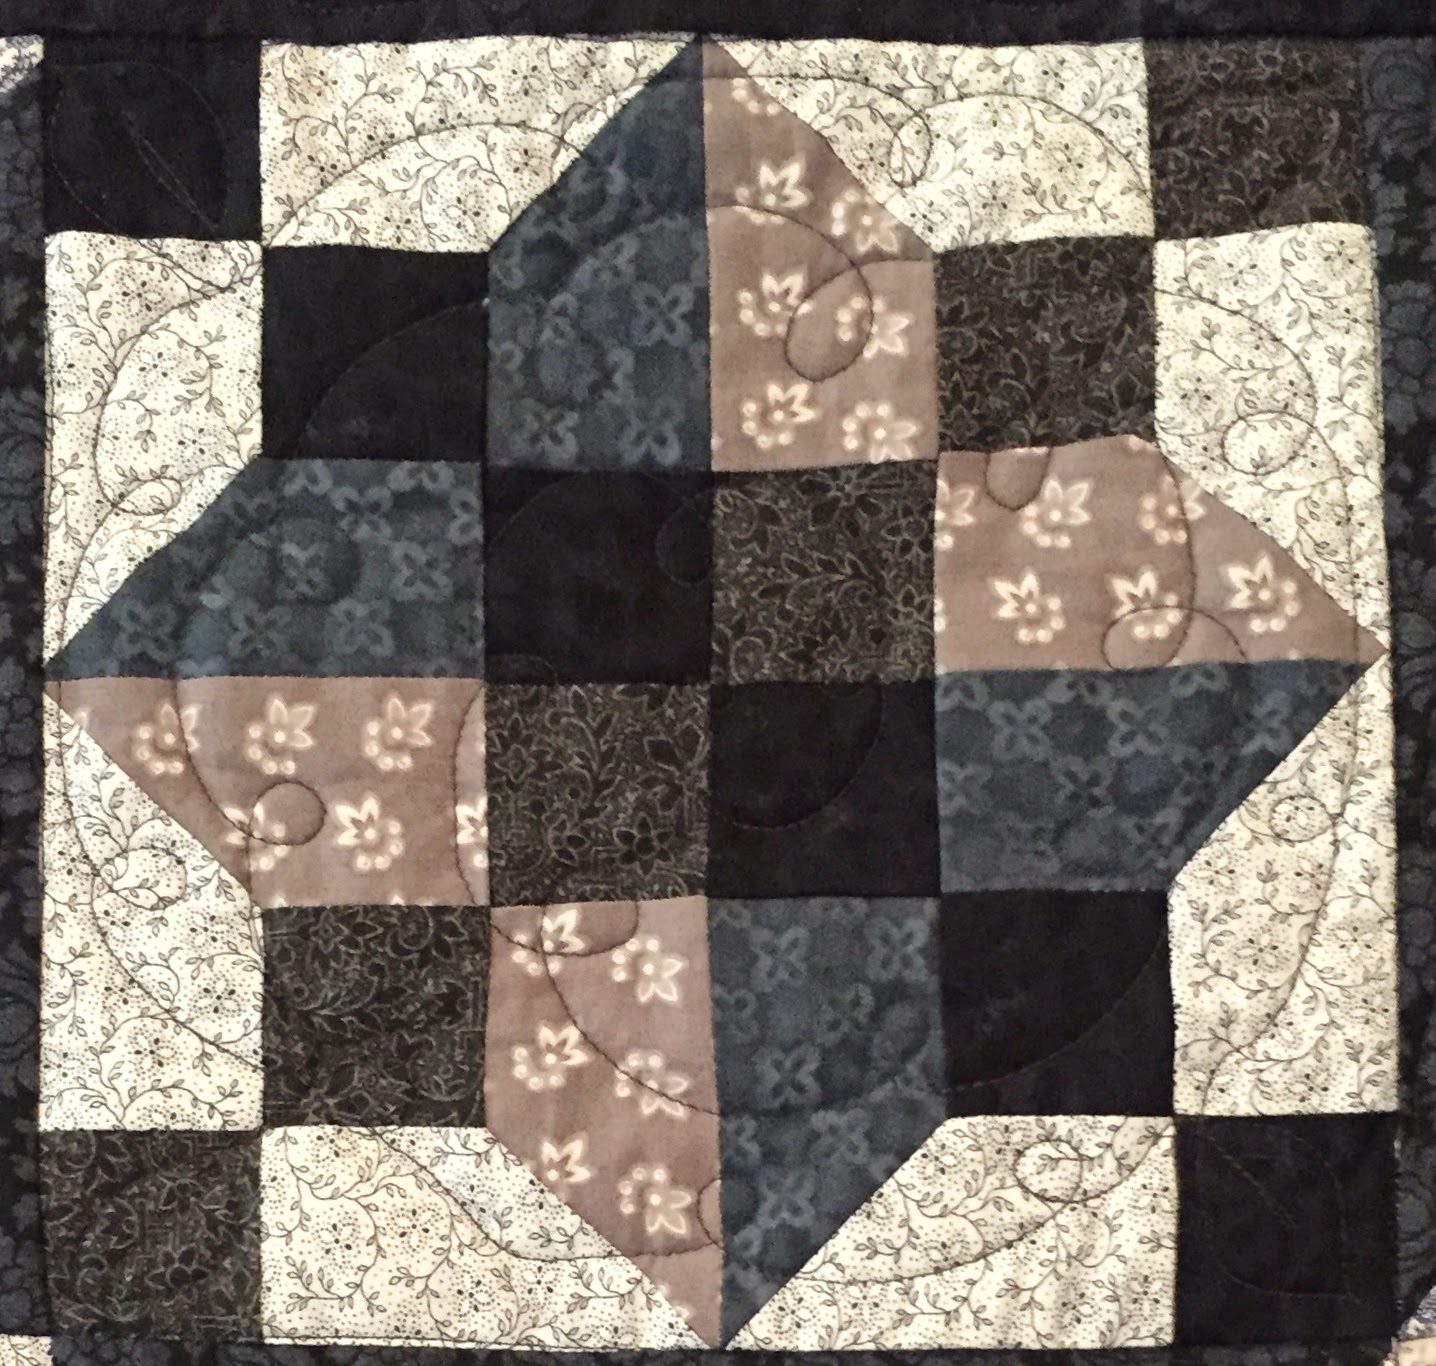
A couple of pieced blocks featured unique patterns within the block. The one on the left is titled Points In and was designed by Denniele Bohannon. The one on the right is titled Reflection and was designed by Denise Starck, the art director for Quiltmaker Magazine. Can you spot my piecing error in this one?


The final block that I am featuring in this post is titled "Friendship Circle" and was designed by Corey Yoder. It features thirteen tiny friendship stars. I chose to use prairie style prints for the star points.
As I come to the end of this post, my season as a quilt block tester is also coming to a close. I have greatly enjoyed the opportunity to serve as a tester for three magazine issues and even to design a quilt with some of the blocks I tested. Working on the test blocks has challenged me, helped me develop new quilting skills, and has helped prepare me to for some new projects that I might otherwise not have pursued.
For the present, I'm finding that I need to devote some additional time to some other projects and pursuits so this is a good time to bring this season of testing to a close. I will simply close this post with a few words from Solomon.
There is an appointed time for everything. An there is a time for every event under heaven. Ecclesiastes 3:1

Tuesday, May 5, 2015

Celebrating Cinco de Mayo with Chicken Enchiladas

As I have clearly established with this blog, my family loves to eat. I don't know that we necessarily favor one type of cuisine over another. As long as it tastes good, we are more than happy to give it a try. 


We are definitely fans of good Mexican food. We enjoy Mexican food more often than Cinco de Mayo, but we are always glad to pull out some of our favorite Mexican recipes in early May. One of these favorites is chicken enchiladas. This is a recipe that we acquired from a recipe book that we received as a wedding gift. This recipe book featured Mexican recipes from Spanish teachers from the state of California. This recipe for chicken enchiladas is just one of the recipes we have enjoyed.

Before proceeding to the recipe and instructions, here is a little background on the history of enchiladas. Enchiladas are essentially some type of filling such as meat, beans, rice, cheese, or vegetables, wrapped in a corn tortilla and covered with a chili pepper sauce. In the Nahuatl language which was spoken by the Aztecs, the word for enchilada is chīllapītzalli, which essentially means "chili flute." 
Aztec pyramid
Enchiladas originated in Mexico and are believed to date back to the Mayans whose diet included corn tortillas wrapped around fish. In more recent history, one of the Spanish conquistadors, Hernan Cortes, is described as giving a feast which included foods wrapped in corn tortillas. The first recipe for enchiladas appeared in a Mexican cookbook titled, El cocinero mexicano ("The Mexican Chef"), which was published in 1831.

As with most recipes, we have adapted it a little to fit our preferences. The recipe that I am sharing in this post reflects the modifications we have made. Although this recipe involves a lot of ingredients, it is well worth the time and effort.


Chicken Enchiladas
2 whole boneless, skinless, chicken breasts (1 lb)
1/2 cup water
2 tsp fresh minced garlic (equivalent to 2 cloves)
1 large onion, finely chopped
3 tbsp butter or margarine
tsp fresh minced garlic (equivalent to 1 cloves)
1 tbsp chili powder (we like using a chipotle chili powder that I brought back from a trip to New Mexico - it adds a nice smoky flavor as well as an extra kick of heat)
2 cans (3 1/2 oz) chopped green chilies
1/2 tsp ground cumin
1/2 tsp salt
1/4 tsp oregano
1/4 tsp pepper
1/4 cup flour
1 cup chicken broth (may prepare using bouillon cube & 1 cup water)
1 cup heavy cream (may substitute half and half)
1/2 lb monterey jack cheese, grated (approx 2 cups)
12 to 16 - 6 inch flour tortillas (may substitute corn tortillas for a more "authentic" enchilada)

Now for the instructions:
Place chicken breasts in medium sized saucepan. Add water and 2 tsp garlic. Cover and bring to a simmer. Cook just until tender. Cool. Remove chicken and reserve broth. Cut chicken into thin strips. Set aside in a medium bowl.

Saute onion in butter or margarine in medium sized skillet just until soft, about 5 minutes. Add 1tsp  garlic, saute 1 minute. Add chilies, chili powder, cumin, salt, oregano, and pepper; cook 1 minute, stirring constantly. Stir in the flour and cook for another minute or so.


Stir in the reserved chicken broth, the prepared chicken broth, and the heavy cream. Cook over medium heat, stirring frequently until mixture thickens, about 10 minutes. Remove from heat. Stir in 1 cup of grated cheese until melted. 

Combine 1 cup of this mixture with the reserved chicken. Preheat oven to 400º.
Divide chicken mixture equally along the center of each tortilla. Here is an idea as to about how much of the chicken mixture we put on each tortilla.
Roll up tortillas and place seam side down in two rows in a 13 x 9 x 2 inch baking dish. Pour remaining cheese sauce evenly over tortillas. Sprinkle with remaining 1 cup of cheese.
Bake at 400 º for 20 minutes or until bubbly. Serve with sour cream and salsa. Mexi-corn and/or Spanish rice make great side dishes.
You will notice that the above picture features a 9 x 9 inch pan. With fewer of us living at home now, we will often prepare the enchiladas in two 9 x 9 inch pans. That gives us one to eat at the present, and one to freeze for later or perhaps share with someone else.

Thursday, April 30, 2015

North and South

One hundred and fifty years ago this month, the American Civil War came to a close. As such, I thought it fitting to focus this post on my "North and South" quilt and to share some of my own reflections on this period in history. 
As my family will tell you, I am a bit of a history geek. I have always been particularly fascinated with 19th century American history, especially with regards to the Westward Expansion and the American Civil War. These interests also carry over into my quilting preferences. Although I enjoy multiple types of quilts and quilting techniques, the prairie style quilts and Civil War era quilts are the ones I love the most. I'm also fascinated by the stories behind these quilts and the women who made them.
As I already mentioned, this posting features the "North and South" quilt that I began a little more than four years ago and finished about three years ago. I found the pattern in one of our local quilt shops and immediately decided that this was one I definitely wanted to make. Although not all of the fabrics in the quilt are Civil War reproduction fabrics, I tried to be as true to the era as possible with my fabric choices and the shades of blue and gray represented in the quilt.
The designer named the seven identical blocks running through the middle of the quilt the "Mason Dixon" line with the blocks above it representing the North or northern battle sites and the blocks below the "Mason Dixon" line representing the South or southern battle sites. Here are a few up close pictures of my favorites.
This block was designated as "Philadelphia Pavement." Although no Civil War battles were fought in Philadelphia, this city was the site of the first abolitionist society in the United States.
This next block is titled "Harpers Ferry." John Brown's failed raid on the arsenal at Harpers Ferry was one of the key antecedent events to the Civil War.
The "Washington Sidewalk" block represents the capital city of the United States. Ironically, perhaps, the Confederate capital of Richmond, VA, was only 110 miles to the south.
The "Kansas Star" block represents the state of Kansas, also known as "bleeding Kansas" during the years leading up to the war because of the series of conflicts between pro- and anti-slavery groups in relation to its admittance to the Union.
The "Road to Missouri" block represents this border state that remained part of the Union although it permitted slavery. Over 1,000 military battles or skirmishes took place in Missouri during the Civil War.
Although the "Gettysburg" block appears below the Mason Dixon line in this quilt, this battle that marked the turning point of the war occurred in Pennsylvania.
At the same time that Lee's army was turned back from Gettysburg, the city of Vicksburg a strategic port city on the Mississippi River surrendered to U.S. Grant. The "Mississippi" block represents this state.
Over the past four years, I have faithfully followed the Civil War Today app for the iPad sponsored by the History Channel. This app gave day-by-day accounts of key events for each day of the Civil War. My favorite section of the app was the diaries, featuring first hand accounts from individuals whose lives were affected by the Civil War. These were individuals such as:

  • Horatio Nelson Taft, an examiner in the US patent office, whose boys often visited the White House to play with Tad and Willie Lincoln during the early years of the war.
  • Judith White McGuire, a loyal Confederate, who was forced from her home in Alexandria, Virginia, during the early months of the war. Her diary speaks of the challenges of finding affordable lodging, obtaining employment, and caring for wounded soldiers. In one of her entries, she speaks of reading accounts of the battles between the Israelites and Philistines from the Bible to a soldier and encouraging him to pray in faith and that God would hear them. The soldier answers, "… but the Philistines didn't pray and the Yankees do; and though I can't bear the Yankees, I believe some of them are Christians and pray as hard as we do."
  • Alexander Downing, a farm boy from Iowa who joins the Union army in the summer of 1861 shortly after his 19th birthday. A few months later, he would be involved in the battle of Shiloh, including taking part in burying the dead. Later, he would take part in the Union siege at Vicksburg, march across Georgia with Sherman's forces, and continue the march northward through the Carolinas until the war came to an end.
  • Bartlett Yancey Malone, from the 6th North Carolina. Although his literacy was limited, he maintained a personal diary even while in a Union prison camp. His entries relate what he had to eat, including opossum. He also relates scripture passages from the chaplains such as, "And the 28 day was clear and warm and Preacher Miller of Company C. preached for ous in the evening and his text was in 126 Psalms and third virse the Text was this The Lord hath done great things for us: Whereof we are glad."
  • Spencer Kellogg Brown, a 21-year-old spy for the Union who would be arrested and executed by the Confederacy. Even while in prison, he remains steadfast in his faith and writes, "I cannot refrain from writing, this morning, how good my Savior has been to me. … come life, come death, I can trust in His love."
In reflecting over this period of history and the perspectives of these diarists, I am reminded of a recent sermon addressing the differences between peace keepers and peace makers. Peace making is an active process whereby the individual seeks to bring about restoration and reconciliation. Perhaps that is why it is the peace makers who are deemed "blessed." I will close this blog post with this simple verse from the Psalms that is as relevant for us today as the day it was written.
Seek peace and pursue it. Psalm 34:14 

Thursday, April 23, 2015

"Go to" desserts - Peanut Butter Oatmeal Bars

If you're like me, you enjoy having a few (or possibly more) "go to" recipes that are both crowd pleasers and can be put together rather easily. If you have a recipe that will work for a larger crowd, that's even better. 
Over the past few years, this recipe has become one of my stand by or "go to" desserts for a number of different potluck events. This is, in part, because these peanut butter oatmeal bars are really quite easy to prepare. They also tend to be very well received, meaning that I won't end up with a lot of leftovers.
Peanuts and products containing peanuts can get a bit of a bad rap because of food allergies, however, peanuts actually are very nutritious. Here's a little background on the history of peanuts and peanut butter.
Although peanuts are often eaten as nuts, they actually are a legume, similar to beans and peas. As you can see from the picture to the right, the pods containing the peanuts actually grow underground. Peanuts are believed to have been first cultivated in Bolivia, and the origins of peanut butter can be traced back to the Aztecs. 
The patent for peanut butter in the United States was issued in 1884 to a Canadian named Marcellus Gilmore Edson. Edson's patent described his process for milling peanuts into a paste and adding sugar. His idea was to create a staple food for people who were unable to chew solid food. His product initially sold for six cents per pound.
Here's how to make peanut butter oatmeal bars. This recipe will fit a sheet cake pan.

Peanut Butter Oatmeal Bars
Ingredients and instructions:

Cream together the following: 
1 cup butter or margarine

1 cup sugar
1 cup brown sugar

Mix in:
2 eggs
1/2 cup milk
2/3 cup peanut butter (you can use either smooth or chunky - most of the time the type I use is dictated by what is available in the pantry)
1 tsp vanilla

Stir in: 
2 C flour
2 C oats
1 tsp salt
1 tsp soda

Spread on greased baking sheet and bake for 20-25 minutes at 350 degrees. When adequately baked, the "bar cookie" will be pulling away from the sides of the pan, and the top will spring back when lightly touched.
Remove the pan from the oven, and sprinkle a 12 ounce bag of semi-sweet chocolate chips over the top. 
Once the chocolate chips have softened, spread them over the top of the bar cookie. Allow to cool completely.
Prepare peanut butter frosting by combining: 
1 cup powdered sugar
1/2 cup peanut butter (again, you really can use either smooth or chunky)
6-8 tbsp milk
Spread the frosting over the chocolate, and cut into bars.

On occasion, I have been known to have a peanut butter oatmeal bar for breakfast. After all, oats are very healthy for you and peanut butter is a great source of protein. That makes them pretty much the same thing as a granola bar, right?

Tuesday, March 31, 2015

Shapes and Pieces

As we come to the last day of March, I thought it would be best to get my second post of the month completed. For good or for bad, even with all of the other projects in my queue, I took on a new project for the year. Back in late January, I made a quick run to the quilt shop for a piece of fabric to finish a project. When all was said and done, I did leave the quilt shop with that one piece of fabric in tow. I also came out having signed up for a block of the week project. That's right - block of the week. Each week, I come to the shop (or send my husband to the shop) and pick up a fabric kit for a new block. By the time we get to the end of January 2016, I will have made 52 hexagon blocks. I haven't yet decided what I will do with them, but I am having fun putting them together and working with the different colors and designs in the fabrics.

These blocks are completed using the English paper piecing technique. Some of you may be familiar with what is often termed as the Grandmother's Flower Garden quilt pattern that features hexagons sewn together. This quilt pattern often features 1930s reproduction prints and makes for a great scrappy quilt.
The basis of these quilt blocks is the English paper piecing technique, however, the finished hexagon is compiled of a combination of many different shapes which may include hexagons, triangles, parallelograms, and trapezoids.
This next picture illustrates the basis of English paper piecing. In the upper left hand corner, you can see that the fabric has been cut about 1/4 inch wider than the shape itself. The card stock shape is pinned to the fabric using short appliqué pins. These short pins do a great job holding the shape and fabric together, and their short length keeps them from poking you as you fold the excess fabric around the shape and then tack down the corners with a basting thread as illustrated in the lower left. The right hand side features five shapes that have been hand-sewn together to create the pattern.  

This next photo shows the front side of the block in progress. You can see that the fabric for the trapezoids has been cut in such a way that the pieces are as identical as possible and create a bit of a kaleidoscope pattern around the edge of the center hexagon.
 Some of the blocks have featured fairly simple, straightforward pieces to arrange together such as these two.
 Others have involved a combination of shapes and involved what is termed as fussy cutting. In this block, I fussy cut the hexagon on the right and the diamond on the left to feature the sunburst/flower pattern in the center. For the lower right hexagon, I fussy cut the hexagon so that the flower was in the center.
This next block also featured some fussy cutting to center flowers inside the diamonds.
I like the kaleidoscope pattern formed by fussy cutting the three center hexagons to feature the identical pattern. Centering the pattern over the hexagon shape for each piece was a bit challenging.
This one featured some elongated pentagons and equilateral triangles arranged around a center hexagon.
 I like the pattern formed by fussy cutting the striped fabric for the trapezoids in this block.
With Holy Week upon us, I will simply close out this posting with a verse reflecting God's gift to us in spite of the shape that we were in. A very blessed and happy Easter season to you all.
But God demonstrates His own love toward us, in that while we were yet sinners, Christ died for us. Romans 5:8