Saturday, May 31, 2014

What's your perspective?

Last summer, I had the opportunity to go to quilt camp. This "camp" was sponsored by one of my favorite local quilt shops, K&H Quilt Shoppe in Kaysville. This was more of a day camp rather than an overnight-style camp. My fellow "campers" and I came to the shop for three consecutive days to work on our quilts.
What made this particular project fun was the very nature of the quilt pattern itself. This is what is called a "scrappy" quilt, and it combined different colors and patterns that one might not typically consider when putting a quilt together. I typically like order and planning so allowing myself to throw caution to the wind and be totally random was a bit of a challenge for me.
Each of us was instructed to bring a specified number of dark- and light-colored fabric strips to the first day of class. Once we got to class, we combined the fabric strips together which further increased the variety, and each camper could pick and choose those she wished to use in her quilt. Although the finished quilt looks as though it is made up of multiple tiny squares, the process for constructing the blocks really isn't that complicated. You can order the pattern for this quilt online at Animas Quilts.
Here is a quick summary of the process for sewing this quilt:
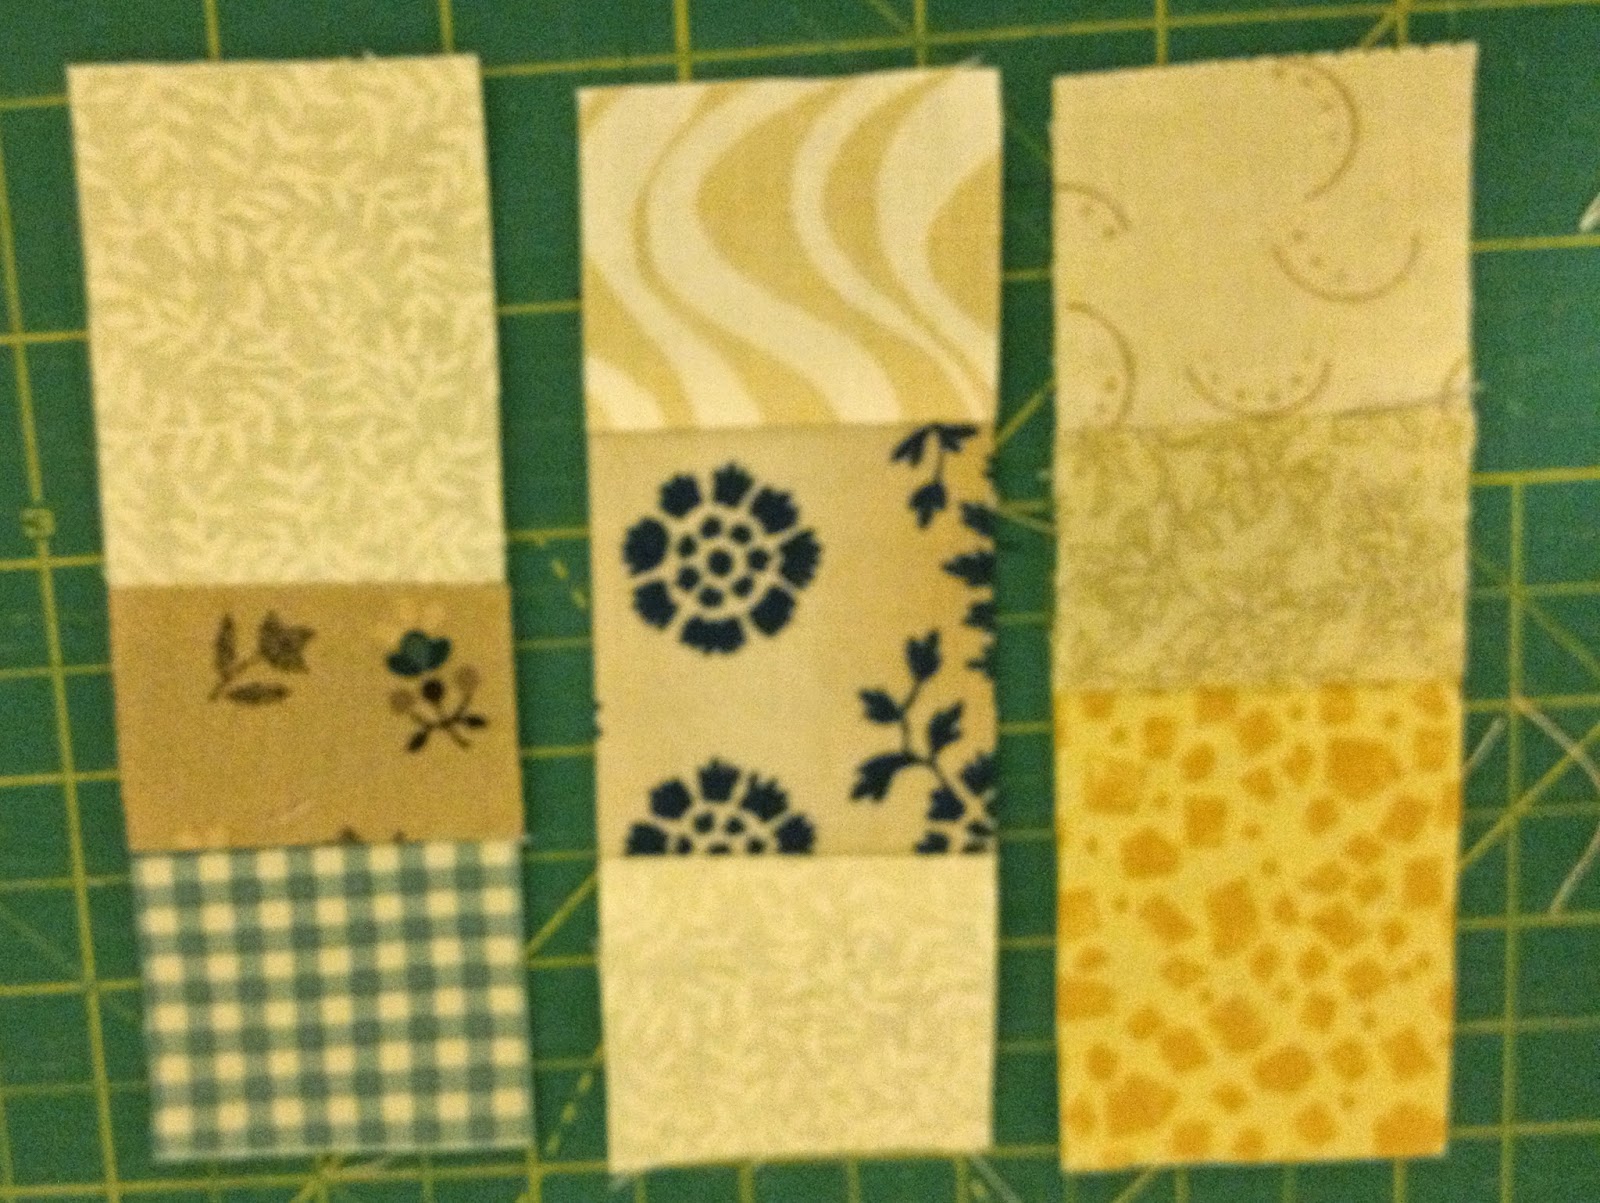
The process begins by selecting three dark or light fabric strips and sewing them together. This picture illustrates three different dark colors. The project involves wider and narrower strips of fabric. In this picture, the strips are arranged in a narrow-wide-narrow pattern. When putting the 3 strips together, the point is to be random and not worry about what may or may not "go" together.
Once the three strips of fabric have been sewn together, they are sub cut into narrower strips. This picture illustrates the process with some strips that have been created with light fabrics. You can see that the two outer strips were created from fabric strips that were sewn together in a narrow-narrow-wide combination whereas the middle one was created from strips sewn together in a narrow-wide-narrow combination. When selecting the narrow 3-piece strips to sew together into a block, the point is again to be random - just keep the lights together and the darks together.
This picture illustrates three strips that have been sewn together. Sorry that it is a bit blurry, but you can still get the idea.
Now, the block is cut in half diagonally. Each light triangle is then, you guessed it, randomly matched up with a dark triangle.
The paired up light and dark triangles will look something like this when sewn together. This is the basic block for the quilt. These blocks are simply rotated within the individual rows to create the larger quilt pattern.

Here are a few close-up pictures of sections within the completed quilt that allow you to see how the basic block unit is repeated and how the rotation of the block within the row helps create the larger image.
A few months ago, my husband purchased a new camera. I've been enlisting his help in taking some higher quality pictures of my finished quilts. These next two pictures feature the feathering in the outer border. I am very grateful to have found a wonderful machine quilter to do this work for me. 

Each of the quilt camp participants received a label to be signed by all of the campers as a fun way to commemorate our time together.
While working on this quilt, I found myself contemplating the nature of what seem to be "scraps" in our own lives. During the course of life's journey, we often experience events that  may seem to be out of place. We may even question how these events could possibly have a purpose. We also experience events that stand out as markers in our lives, both positively and negatively. Other times, we feel that we are experiencing one random event after another and seek to understand how these events all tie together.
For us as believers, we can rest secure in trusting a God for whom nothing is random. While we are often limited to visualizing what is present, God is constantly aware of the larger work He is creating within us. We may wonder how that red flowered fabric is ever going to go with the black and gold plaid, yet God can bring these pieces together in a way that results in a work of beauty that more than exceeds our expectations. 
With this particular quilt, if we keep our focus on the individual squares and triangles, we miss the larger image that is created. In our lives, if we keep our focus solely on individual events, we miss the opportunity to see the larger work that God is creating. God doesn't promise the believer that all things are good, but He does promise that He can work all things together for good.
And we know that God causes all things to work together for good to those who love God, to those who are called according to His promise. Romans 8:28

Friday, May 23, 2014

Cassoulet (or what to do with the last of your Easter ham)


Please rest assured that I am not just now finishing the last of my Easter ham. It has been long gone for some time now. I am just now, however, finding the time to get this post written.

The story behind this recipe does date back a few years ago when Easter happened to fall late in April. With Kentucky Derby weekend falling in early May, I still had the Easter ham bone with the final remnants of meat on it. I was looking for Kentucky Derby-themed recipes, and I found a recipe collection that included cassoulet. I had never heard of cassoulet before so I was rather intrigued. As I read through the list of ingredients, I came across one called "duck confit." I had never heard of duck confit before either so I looked it up. It turns out that "confit" refers to a process of cooking and preserving meat in its own fat, so sort of a congealed duck product. I didn't exactly find myself feeling particularly keen about incorporating duck confit into my recipe so I did some additional searching for other variations on cassoulet. Here is a little of what I learned. Trust me, I will get back to the Easter ham.

Cassoulet is a French slow-cooked casserole dish somewhat akin to America's Boston baked beans. It is presumed to have originated in the Languedoc province of France and more specifically in the towns of Toulouse, Carcassonne, and Castelnaudary.
Much like the baked beans that are cooked in an earthenware pot on the hearth, traditional cassoulet is prepared in an earthenware dish called a cassoule. The conical shape is typical of the cassoule. The first picture below shows a cassoulet being prepared in a cassoule. The second shows a cassoulet that was prepared in a single-serving cassoule.
Although a number of variations on the precise cassoulet ingredients exist, the inclusion of white beans is consistent throughout. Cassoulet recipes also tend to include poultry such as duck or goose and sausages. Other recipes may include pork, mutton, or bacon. Here is where the Easter ham comes back in. I liked the idea of using sausages and decided to replace the duck confit with the remaining Easter ham. 
I'm not entirely sure whether someone with a taste for French cuisine would venture so far as to call my revised recipe "cassoulet" or not. At any rate, we think it tastes pretty good. We also think that the flavor of the honey-baked ham adds to the overall flavor of the cassoulet. You will also see that we include black-eyed peas and large lima beans in addition to the small site beans. We like the variation.
Here is the recipe. Feel free to provide feedback.

Cassoulet (or our version of it)
½ pound each of black-eyed peas, small white beans (navy beans), and large lima beans
Cover the beans with water and soak them over night. In the morning, drain the beans. 
Return the beans to the pot and add the following:
  • 2 quarts of chicken broth - you may need to add more while cooking
  • One large sweet onion, chopped
  • Sliced carrots and celery (I never measure these exactly; I just add in what looks about right in proportion to the beans.)
  • Chopped ham. (As I have already mentioned, I like using the leftover ham bone from our Easter honey-baked ham. We tend to leave extra ham on the bone just for cassoulet. I just put the whole bone along with the ham in the pot.)
  • Sausage (We prefer to use andouille sausage which adds a little heat to go with the sweet of the ham. I have used both Chef Bruce Aidells Cajun Style Andouille pre-cooked sausage links and uncooked andouille. If using uncooked, we grill them before adding to the soup. With either type, we slice them into coins before adding them to the pot.)
I find that the flavors meld together really well so I don't add a whole lot of extra seasoning. I tend to stick with the basics of:
  • Salt
  • Pepper
  • Thyme
  • Garlic (just a little; this is one time we go light on the garlic)
  • Parsley
Cook until the beans and vegetables are tender. Remove the ham bone. Cut off any extra ham and return the meat to the pot.
Serve with salad and warm, fresh bread.

Wednesday, April 30, 2014

Contemplating Projects

For those of us who enjoy sewing and quilting projects, acquiring fabric can be as much of an art as the process of piecing and sewing it together. No matter how many projects we are working on at the present, we always seem to be able to justify the purchase of more fabric - often for some yet-to-be-determined project. The cartoon below provides a rather clever illustration of this practice.
Earlier this month, I need to confess that I acquired fabric in contemplation of some future project. I had a meeting in Seattle, and used the handy-dandy quilt shop finder app on my iPhone to locate quilt shops in the area. Fortunately I was able to locate a shop, Undercover Quilts, within walking distance of my hotel. This is a somewhat small shop, tucked away in the famous Pike Street Market, but I very much enjoyed the feeling of being in a local shop, visiting with the owners, and browsing the fabrics and patterns unique to the shop and the Pacific Northwest, in general.
I picked up a pattern and kit that was designed by one of the shop owners. I love polar bears and am becoming more adept with machine appliqué, so this seemed an appropriate kit to try. I will post pictures when I finish it.
The fabrics that particularly caught my eye, however, were these beautiful ones, designed by a Seattle-area artist, featuring wildlife of the Pacific Northwest. The artist has done a beautiful job of incorporating native art styles into the outlines of the sea-based and land-based wildlife.
Although I only lived in Alaska for a very short time, I do have images of the totem poles and other native art and am still very much fascinated by them. It's hard to say which of these images I like the best, so I will go ahead and share pictures of the wildlife featured in these fabrics.

The challenging part now is going to be to determine how to combine and arrange these  fabrics into a quilt that showcases their beauty. At the present, the fabrics are already amazing and beautiful, however, their full potential of being placed into a larger project that can be used for decoration or warmth (or possibly both) has not been realized.
As I contemplate what that future larger project might be, I also find myself reflecting on my own state as a project in the works. In his final book of the Chronicles of Narnia series, The Last Battle, C. S. Lewis penned a chapter titled "Farewell to the Shadowlands" in which the characters come to realize that their lives in this present world had been only a shadow of the greater "real" world that they were experiencing as they followed Aslan "further up and further in."
Even so, our lives are yet an image of what is to be experienced in heaven. In his first letter to the Corinthians, Paul likens this present world to an incomplete image seen in a mirror. He also gives instruction as to what our conduct should be as we look ahead to the complete reality to come.
For now we see in a mirror dimly, but then face to face; now I know in part, but then I will know fully just as I also have been fully know. But now faith, hope, love, abide these three; but the greatest of these is love.       1 Corinthians 13:12-13

Saturday, April 19, 2014

Easter Cake

Truth be told, I typically prefer pies or cookies to cake. This cake, however, has become one of my favorites through the years. I call it "Easter Cake" because I usually only make it once a year, at Easter. It often doubles as my sister's birthday cake given that her birthday often falls near Easter. 
The yellow cake base itself can be made either from scratch or from a box. My preference is to do my baking from scratch - to me, the cake just tastes better that way. Here is the recipe that I use for the cake.
Cake:
2 cups all-purpose flour
1 1/2 cups sugar
1/2 cup shortening
1 cup milk
3 1/2 tsp baking powder
1 tsp salt
1 tsp vanilla
3 eggs
Preheat oven to 350º. Grease and flour or spray with nonfat cooking spray a 13 x 9 x 2 inch oblong pan. Beat all ingredients on low speed, scraping bowl constantly for 30 seconds. Beat on high speed, scraping bowl frequently for 3 minutes. Pour into pan. Bake for 40 to 45 minutes until toothpick inserted into center comes out clean.
Even though I can bake a cake that tastes good, I don't always bake a cake that comes out of the oven looking pretty as you can see in the photo below. Fortunately, this Easter Cake features a number of very tasty toppings that cover a multitude of flaws.
While the cake is baking, you can begin preparing the first topping. This one is a layer of crushed pineapple. Boil together the following two ingredients until thick and syrupy, about 20 minutes.
  • 1 can (20 oz) crushed pineapple, including its own juice
  • 3/4 cup sugar
While the cake is still warm, poke holes across the top of the cake at about 1-inch intervals. 
Pour the pineapple mixture over cake and spread evenly. Allow the cake to cool completely.
After the cake has cooled, mix together:
  • 2 packages (3 1/2 oz each) instant vanilla pudding mix
  • 3 cups milk
Note that the amount of milk for this step is less than what you would use if you were preparing the pudding per the box directions. This smaller volume of milk will result in a thicker pudding topping for the cake. Spread it over the top of the cake.
The next step is to prepare the whipped cream topping. If you wish, you can use Cool Whip. If you are like me, the superior taste of real whipped cream is worth the extra cost and effort. You will need the following ingredients:
  • 1 cup heavy or whipping cream
  • 1/4 cup powdered sugar
  • 1 tsp vanilla
Beat the whipping cream until soft peaks form. Add powdered sugar and vanilla; continue beating until stiff. Spread over cake. Refrigerate overnight.

Before serving the cake, sprinkle with 3/4 cup of toasted coconut. I like to use a "shortcut" and "toast" the coconut in the microwave. I use a microwave safe container (typically a plastic one), and toast the coconut for about 2 minutes, pausing every 20-30 seconds to stir the coconut and prevent it from burning. Here is how the coconut turns out, followed by a picture of the completed cake.


In celebration of the Easter season, here is a song that celebrates the glorious resurrection day! Easter blessings to you all!