Sunday, December 31, 2017

Christmas Cuddles

As the final hours of 2017 are ticking away, I hope that you have had a very blessed and happy Christmas season. I was initially hoping to have this entry posted in advance of Christmas, but it will have to turn in to a Happy New Year post instead.
This post features one of the quilt kits that I acquired during the 2017 Shop Hop. I was particularly drawn to the fabrics in this quilt, in part because of the familiarity in the storybook prints. 
I also found some of the fabrics included in the "snowball" blocks reminiscent of Christmas prints from about the 1960s.
I was really pleased with the quilting work that Utah Valley Quilting provided for this project. I picked some all-over swirls for the center and the outer border of the quilt. I decided to go with a snowflake pattern for the white area between the trees. I like the way this pattern filled the space without adding too much "stuff" and "busyness."
Because my goal for this quilt was to have it serve as a cozy, cuddle up quilt for the Christmas season, I opted to use minky fabric for the back. For those of you not familiar with minky, it is a 100% polyester fabric with a soft pile that is slightly stretchy. It is much softer than fleece and is a great choice for baby blankets. Quilters tend to have mixed feelings about working with minky. Because of its stretch, it can be a bit of a challenge to hold in place. On the other hand, some really like it because of how the quilting design shows on the back. You may need to adjust your computer screen to enlarge the below picture to see the details on the trees in the inner border. I've also found that when I'm sewing the binding on my quilts with minky backs, I need to take extra care to ensure that my needle is going through the minky.
As you can see from the picture below, my cat approved of this quilt. If you look closely, you can see the clips that I use to hold the binding in place as I sew it. Perhaps I will use a future post to tell more about these and some of my other favorite quilting notions. In case you were wondering, I opted not to disturb the cat's nap at this point in time. The quilt was, however, finished before Christmas.
I am one who definitely enjoys the comfort in the familiar, particularly around the Christmas season. As much as I enjoy the memories and traditions associated with the familiar, I've been reminded in recent weeks not to allow myself to get so attached to the familiar that I miss out on new opportunities that may lie ahead. The Christmas/New Year's season provides the context for reflecting on the blessings of the past while anticipating the blessings that lie ahead.
As we enjoy these final hours of 2017, I pray that you will look with anticipation to the new year. I will close with these verses that were included on our church's bulletin cover this morning.
The LORD bless you, and keep you; the LORD make His face shine on you, and be gracious to you; the LORD lift up His countenance on you and give you peace. 
Numbers 6:24-26

Tuesday, December 19, 2017

Christmas Candy Chemistry Part II: Chocolate Covered Cherries

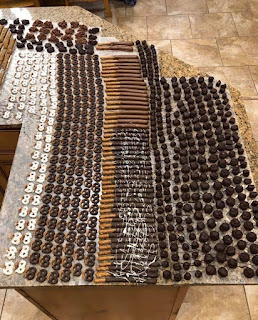
For around 20 years now, dipping chocolates at Christmastime has become one of our traditions. After receiving some homemade chocolates as a gift, we decided to learn more about the process and have since made it our own. In the top picture, you can see the results of this year's efforts. For this particular post, however, I will focus on making chocolate cherries with some attention to the chemistry related to managing the chocolate throughout the dipping process.
The recipe I will be sharing will make about 50 or 60 cherries, essentially the number included in a 16 ounce jar. You then wrap the drained cherries in fondant and dip them in chocolate. Sounds easy, right? OK, perhaps not all that easy so here are the steps that we follow.

I will usually begin the work of preparing the cherries a few days before we undertake the dipping process. I will typically drain the jar of cherries in a colander and then place them on a paper towel or two to absorb additional liquid.

The next step is to prepare the fondant. The amount produced by this recipe will wrap around all of the cherries.
Fondant ingredients:
3 tablespoons butter (use the real stuff)
3 tablespoons light corn syrup
1/4 teaspoon salt
2 cups powdered sugar
Steps to making the fondant:
1. Allow the butter to soften slightly at room temperature to make it easier to handle. Do not melt the butter. Melting the butter by heating it results in a chemical change and will result in a fondant that is extra sticky and very difficult to manage.
2. Stir the butter, corn syrup and salt together. This will take a bit of time and effort. I use a wooden spoon and gradually mash the butter into the corn syrup.
3. Gradually stir the powdered sugar into the butter/corn syrup mixture. You really will be able to mix it all in.
4. Allow the fondant to chill in the refrigerator. Although it's relatively easy to handle, chilling it will make it more manageable.

Now it's time to prepare the cherries for dipping:
1. Shape an approximately 1 teaspoon portion of the fondant around each cherry. I will typically flatten it out a bit before I wrap it around the cherry. Here is a picture of some fondant-wrapped cherries that are ready for dipping. You can place them in the refrigerator to chill while you are preparing the chocolate.
2. Prepare the chocolate. This involves a process known as tempering the chocolate. This process has nothing to do with the chocolate's disposition but rather the chemical structure of its components. Tempering chocolate involves heating the chocolate to a series of temperature that will allow it to form a stable structure. In our earliest years of dipping chocolate, we created a makeshift double boiler with a couple of our saucepans and did our best to estimate the temperature with a mercury candy thermometer. 
A few years ago, we invested in this counter top machine that allows the chocolate to heat and then cool to the specified temperatures based on the type of chocolate - dark, milk, or white. In the below picture, you can see that we are heating dark chocolate which is our favorite.

The buttons on the machine allow you to select the type of chocolate and then enter the stages of the tempering process. First, the chocolate needs to melt completely at around 115ºF. If the temperature gets too hot, the chocolate will burn and the chocolate acquires a grainy texture that can not be recovered.
Second, the chocolate needs to cool to about 88-92ºF. At this temperature, the chocolate forms crystals that remain firm and create a stable structure around the center.
A key advantage of this machine is that it is able to hold the chocolate at the desired temperature for dipping. Because the cherries have chilled, they have the potential to cool the temperature of the chocolate. 
3. Dip the fondant-wrapped cherries. Place the cherries, one or two at a time, into the melted chocolate. Allow them to become fully coated, lift them out of the chocolate with a fork or other dipping tool, tap off any excess chocolate, and place them on a sheet of waxed paper. Allow them to sit on the countertop for a day or two to allow the chocolate to cure. Store in an airtight container.
Dipping chocolates is, indeed, a bit of an undertaking and consumes most of a weekend. Just the same, the results are pretty amazing, and we enjoy sharing them with our friends.
Here are a few other pictures of our chocolate dipped treats. These include pretzels, caramel pecan clusters, and Rice Krispie clusters.