Sunday, December 31, 2017

Christmas Cuddles

As the final hours of 2017 are ticking away, I hope that you have had a very blessed and happy Christmas season. I was initially hoping to have this entry posted in advance of Christmas, but it will have to turn in to a Happy New Year post instead.
This post features one of the quilt kits that I acquired during the 2017 Shop Hop. I was particularly drawn to the fabrics in this quilt, in part because of the familiarity in the storybook prints. 
I also found some of the fabrics included in the "snowball" blocks reminiscent of Christmas prints from about the 1960s.
I was really pleased with the quilting work that Utah Valley Quilting provided for this project. I picked some all-over swirls for the center and the outer border of the quilt. I decided to go with a snowflake pattern for the white area between the trees. I like the way this pattern filled the space without adding too much "stuff" and "busyness."
Because my goal for this quilt was to have it serve as a cozy, cuddle up quilt for the Christmas season, I opted to use minky fabric for the back. For those of you not familiar with minky, it is a 100% polyester fabric with a soft pile that is slightly stretchy. It is much softer than fleece and is a great choice for baby blankets. Quilters tend to have mixed feelings about working with minky. Because of its stretch, it can be a bit of a challenge to hold in place. On the other hand, some really like it because of how the quilting design shows on the back. You may need to adjust your computer screen to enlarge the below picture to see the details on the trees in the inner border. I've also found that when I'm sewing the binding on my quilts with minky backs, I need to take extra care to ensure that my needle is going through the minky.
As you can see from the picture below, my cat approved of this quilt. If you look closely, you can see the clips that I use to hold the binding in place as I sew it. Perhaps I will use a future post to tell more about these and some of my other favorite quilting notions. In case you were wondering, I opted not to disturb the cat's nap at this point in time. The quilt was, however, finished before Christmas.
I am one who definitely enjoys the comfort in the familiar, particularly around the Christmas season. As much as I enjoy the memories and traditions associated with the familiar, I've been reminded in recent weeks not to allow myself to get so attached to the familiar that I miss out on new opportunities that may lie ahead. The Christmas/New Year's season provides the context for reflecting on the blessings of the past while anticipating the blessings that lie ahead.
As we enjoy these final hours of 2017, I pray that you will look with anticipation to the new year. I will close with these verses that were included on our church's bulletin cover this morning.
The LORD bless you, and keep you; the LORD make His face shine on you, and be gracious to you; the LORD lift up His countenance on you and give you peace. 
Numbers 6:24-26

Tuesday, December 19, 2017

Christmas Candy Chemistry Part II: Chocolate Covered Cherries

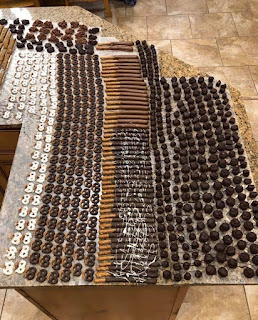
For around 20 years now, dipping chocolates at Christmastime has become one of our traditions. After receiving some homemade chocolates as a gift, we decided to learn more about the process and have since made it our own. In the top picture, you can see the results of this year's efforts. For this particular post, however, I will focus on making chocolate cherries with some attention to the chemistry related to managing the chocolate throughout the dipping process.
The recipe I will be sharing will make about 50 or 60 cherries, essentially the number included in a 16 ounce jar. You then wrap the drained cherries in fondant and dip them in chocolate. Sounds easy, right? OK, perhaps not all that easy so here are the steps that we follow.

I will usually begin the work of preparing the cherries a few days before we undertake the dipping process. I will typically drain the jar of cherries in a colander and then place them on a paper towel or two to absorb additional liquid.

The next step is to prepare the fondant. The amount produced by this recipe will wrap around all of the cherries.
Fondant ingredients:
3 tablespoons butter (use the real stuff)
3 tablespoons light corn syrup
1/4 teaspoon salt
2 cups powdered sugar
Steps to making the fondant:
1. Allow the butter to soften slightly at room temperature to make it easier to handle. Do not melt the butter. Melting the butter by heating it results in a chemical change and will result in a fondant that is extra sticky and very difficult to manage.
2. Stir the butter, corn syrup and salt together. This will take a bit of time and effort. I use a wooden spoon and gradually mash the butter into the corn syrup.
3. Gradually stir the powdered sugar into the butter/corn syrup mixture. You really will be able to mix it all in.
4. Allow the fondant to chill in the refrigerator. Although it's relatively easy to handle, chilling it will make it more manageable.

Now it's time to prepare the cherries for dipping:
1. Shape an approximately 1 teaspoon portion of the fondant around each cherry. I will typically flatten it out a bit before I wrap it around the cherry. Here is a picture of some fondant-wrapped cherries that are ready for dipping. You can place them in the refrigerator to chill while you are preparing the chocolate.
2. Prepare the chocolate. This involves a process known as tempering the chocolate. This process has nothing to do with the chocolate's disposition but rather the chemical structure of its components. Tempering chocolate involves heating the chocolate to a series of temperature that will allow it to form a stable structure. In our earliest years of dipping chocolate, we created a makeshift double boiler with a couple of our saucepans and did our best to estimate the temperature with a mercury candy thermometer. 
A few years ago, we invested in this counter top machine that allows the chocolate to heat and then cool to the specified temperatures based on the type of chocolate - dark, milk, or white. In the below picture, you can see that we are heating dark chocolate which is our favorite.

The buttons on the machine allow you to select the type of chocolate and then enter the stages of the tempering process. First, the chocolate needs to melt completely at around 115ºF. If the temperature gets too hot, the chocolate will burn and the chocolate acquires a grainy texture that can not be recovered.
Second, the chocolate needs to cool to about 88-92ºF. At this temperature, the chocolate forms crystals that remain firm and create a stable structure around the center.
A key advantage of this machine is that it is able to hold the chocolate at the desired temperature for dipping. Because the cherries have chilled, they have the potential to cool the temperature of the chocolate. 
3. Dip the fondant-wrapped cherries. Place the cherries, one or two at a time, into the melted chocolate. Allow them to become fully coated, lift them out of the chocolate with a fork or other dipping tool, tap off any excess chocolate, and place them on a sheet of waxed paper. Allow them to sit on the countertop for a day or two to allow the chocolate to cure. Store in an airtight container.
Dipping chocolates is, indeed, a bit of an undertaking and consumes most of a weekend. Just the same, the results are pretty amazing, and we enjoy sharing them with our friends.
Here are a few other pictures of our chocolate dipped treats. These include pretzels, caramel pecan clusters, and Rice Krispie clusters.


Thursday, November 30, 2017

The Pony Express: Orphans Preferred

This past fall, I embarked on a bit of a quilting journey. Around the Labor Day weekend, I learned of a "Pony Express Block Party" that was being sponsored by Northcott Fabrics. To make a long story short, the "party" involved a line of fabrics emphasizing the Pony Express and participating quilt shops located in the states through which the Pony Express ran. 
Those who participated in this block party were challenged to visit participating shops to acquire a free block pattern. Participants were then issued a challenge of creating a quilt featuring at least six different blocks from six individual participating shops.
Because I enjoy the history of the American West, I was intrigued by this "Block Party" and decided to start visiting some shops. I then decided to go ahead and create a quilt to enter in the challenge contest. Because some of the shops designed 12-inch blocks while others designed 6-inch blocks, I had to make some decisions about my own quilt's design. I opted to go with smaller blocks and then had to size down some of the block patterns. To add a little variety, I put them "on point" and created my own corner blocks. I hope that you will enjoy a few close up looks at some of the blocks.
This star pattern is actually featured twice in the quilt. Can you find the other version of it?
These arrowheads required curved seams. This was actually my first effort at sewing a block with curved seams. The points aren't as exact as I would like, but I enjoyed giving this block a try.
When turned on point, this block takes on a fun zigzag appearance. Interesting what a 90 degree shift can do to your perspective.
With this quilt, I also opted to be deliberate with how I designed the back. Rather than attempting to incorporate a panel featuring the map of the Pony Express route on the front, I centered it on the back. 
For those of you a little less familiar with the history of the Pony Express, it ran for only 18 months between April 1860 to October 1861. The length of the route was 1966 miles. Stations were located approximately 10 miles apart. Riders changed horses at each station and would ride for approximately 100 miles before being replaced by the next rider. The Pony Express allowed mail to be transported from Missouri to California in 10 days (up to 16 days during the winter). By comparison, transporting mail via stagecoach would take 24 days.
The identities of many of the Pony Express riders are shrouded in obscurity. No one knows the name of the first rider or the precise location in St. Joseph, Missouri, from which he departed. Advertisements for Pony Express riders give us some insight into their characteristics. They were to be young (18 years or younger), skinny, wiry expert riders who were willing to risk death daily. Advertisements also noted that orphans were preferred, suggesting perhaps, that these riders were regarded as expendable.
Reflecting on this history has also given me opportunity to reflect on our status both from the perspective of the world and from God's perspective. While the world may see us as obscure and expendable, we are raised to significance through what Christ has done for us. With the Advent season upon us, this particular passage from Galatians seems fitting for closing this post.

But when the fullness of the time came, God sent forth His Son, born of a woman, born under the Law, so that He might redeem those who were under the Law, that we might receive the adoption as sons. Because you are sons, God has sent forth the Spirit of His Son into our hearts, crying, “Abba! Father!" Therefore you are no longer a slave, but a son; and if a son, then an heir through God. Galatians 4:4-7

Sunday, November 5, 2017

Turkey soup with a Minnesota North Woods flair

Now that November is finally here, I can "officially" begin my Thanksgiving preparations. As much as I enjoy the work of preparing everything for our Thanksgiving dinner, I also enjoy the immediate post-Thanksgiving season of putting those turkey leftovers to good use.
As I have shared before, our Black Friday tradition is to make turkey and andouille sausage gumbo. With as much turkey as we prepare, however, we still have plenty of leftovers for sandwiches, additional types of soup, and even to put into the freezer for later. For us, working with the leftover turkey is part of our Thanksgiving weekend fun. We will typically oven roast a medium sized turkey and then smoke two turkey breasts. We smoke one with cajun spices and one with herbs from the garden.
This soup includes wild rice which provides the Minnesota North Woods flair. Wild rice is actually the grain that comes from a grass. Three species of wild rice are native to North America. The one I will emphasize here is Zizania palustris, which is native to the Great Lakes region of the United States and Canada. This species was historically harvested by the Ojibwa This picture illustrates the traditional harvesting process with one individual tasked with paddling the canoe with others threshing the grain into the bottom of the canoe.
Wild rice has a distinct flavor and is also highly nutritious. Wild rice contains 4 grams of protein per 100 calories and is second only to oats in terms of protein content among grains. Wild rice is also a great source of lysine, dietary fiber and B vitamins.
Here is how we make this post-Thanksgiving favorite.

Ingredients
2/3 cup uncooked wild rice
2 cups water
6 tablespoons butter
1/4 - 1/2 cup chopped onion
1/4 - 1/2 cup chopped celery
1/2 - 1 cup sliced carrots
1/3 cup flour
2 quarts turkey (or chicken) broth
2 cups chopped cooked turkey
Salt and pepper to taste
1/4 cup slivered almonds
1/2 teaspoon lemon juice
1 cup half and half

Instructions:
1. Bring the wild rice and water to a boil in the saucepan. Simmer until the rice is tender, approximately 40-45 minutes (wild rice needs longer to cook relative to white rice). Allow the rice to set for about 5 minutes and fluff with a fork. Set aside until later.
2. Melt the butter in a soup pot over medium heat. Add the onion and cook until the onion becomes soft. Stir in the celery and carrots and cook until they are slightly softened.
3. Stir in the flour and cook until it becomes a pale yellowish color (something like in the picture below).
4. Whisk in the turkey broth until no lumps of flour remain. Simmer until the vegetables are tender.
5. Stir in the wild rice, turkey, salt, pepper, and almonds. Here's an approximation of the turkey. Of course, you can include as much as you want. Simmer for another few minutes until the entire mixture is heated through. We like to include a mixture of our smoked turkey and our regular roasted turkey.
6. Stir in the lemon juice and half-and-half. Bring the soup almost to a boil (avoids the half-and-half separating out). Serve warm. Note: you can also freeze this soup as well. We typically double the recipe, enjoy a meal's worth and then freeze the rest.

Wishing you blessings as we anticipate the Thanksgiving season.

Sunday, October 29, 2017

Halloween Donuts

Although I am describing these donuts as "Halloween" donuts, they really are not exclusive to this time of year. As many of you have already discerned through my posts through the years, I am quite a connoisseur of fall and the colors and foods associated with this time of year. Donuts seem to be one of those treats that I associate with late fall. For the past few years, we have used the Halloween season as an opportunity to make them.
The origins of the modern donut (or doughnut) can be traced back to the Dutch settlers of New Amsterdam, which is now New York. The American author Washington Irving, who is best known for The Legend of Sleepy Hollow, described doughnuts as being present among the desserts being served at a Dutch gathering. He also noted that doughnuts were seldom seen anywhere other than in Dutch homes. On a seasonal side note, The Legend of Sleepy Hollow is set in a Dutch settlement in New York. Perhaps Ichabod Crane ate a few too many doughnuts before setting off on his fateful ride.
So, back to the recipe for these donuts…
This recipe includes yeast, but you mix up the dough and let it rise in the refrigerator overnight. You then can fry up the donuts at your leisure either the next morning or whenever it is convenient for you.

1 package active dry yeast
1 cup warm water (105 - 115 degrees F) Note: if you are using rapid rise yeast, follow the package recommendations regarding water temperature.
3 1/4 cups flour
1/3 cup plus 1 tsp sugar
1 tsp salt
1 egg, lightly beaten
1/3 cup softened butter

Canola oil for frying

Cinnamon and sugar mixture 

I use my Kitchenaid stand mixer for these but, you can also use a regular hand mixer and then a spoon.

1. In a large bowl, stir together the yeast, warm water, and 1 tsp sugar. Let the mixture sit until the yeast starts to bloom. If it hasn't started "blooming" after a few minutes, discard and start over. Be careful to note the water temperature.
2. Add 1 1/2 cups of flour, the 1/3 cup sugar, and the salt. You can use either an electric mixer or the mixing blade on a stand mixer. Mix in the egg and softened butter.
3. For this next step, use a wooden spoon or the dough hook for a stand mixer. Stir in 1 3/4 cup flour until the dough is smooth. 
4. Cover the ball of dough and place it in the refrigerator for at least 2 hours or overnight.

Now it's time to roll out the donuts. Roll the dough out on a generously floured board or countertop to approximately 1/2 inch. I like using a donut cutter (pictured below) for cutting the donuts and holes. Prior to acquiring this gadget, I would cut out the larger circle and then find a small object to cut out the hole.

Here are some rolled out and cut donuts and holes ready for frying

Heat the oil to 325 to 350 degrees F. Fry until golden brown, approximately 1 minute per side. When the donuts are adequately deep fried, use a slotted spoon to transfer them to a wire cooling rack or to a large plate lined with paper towels to help absorb excess oil. 
While the donuts are still warm, dip them in the cinnamon sugar mixture.
These donuts are best eaten fresh so they are a great treat for a gathering of people. Or, you can just have a good appetite on hand and be prepared to enjoy a bunch of them.

Tuesday, October 24, 2017

Halloween Cat

Halloween cat, Halloween cat
Why do you mew and mew like that?
Neither I nor the moon,
Like your tune 
So scat! Halloween cat!
At least that is how the preschool song goes. This was a favorite of my middle child who happened to be born in late October and always loved dressing up in his Halloween costumes.
Although I've created a number of fall-themed quilting projects through the years, this is the first distinctly Halloween quilt that I have made. The pattern is one that I picked up while quilt shop hopping in 2015. Although the example wasn't Halloween specific, I thought it would be a great project for using some of the Halloween prints that I had collected over the years. I also wanted to add a few embellishments of my own to give it a little more of a seasonal look. I do have to say that I was quite pleased with the end result. I hope you will enjoy a closer look at this creation as well.
I was able to find an outline of a bat that I could size down to fit the pattern. I made sure to include a purple cat and to find a way to use other fun prints such as the one with squiggly lines.
For the spider, I traced the oval and then used embroidery thread to free-hand the legs and silk strand. Note the plaid with bats and the polka dot print for the cats.
I borrowed the broom pattern from a snowman quilt pattern. Here the squiggle pattern is horizontal to add a little variety.

The pumpkin shapes are also borrowed from other appliqué patterns.
Picking out the quilting patterns was fun. Rather than a feather pattern for the border, I opted for this one called "Pumpkin Pie." I like the way it turned out.
For the middle, I opted for an edge-to-edge design that featured leaves and vines.
Here's another look at the quilting.
I know that among my readers there are likely to be multiple attitudes toward Halloween. This particular commentary is one that resonates with me and some of the attitudes I have toward this holiday: Signposts: How should Christians handle disagreement over Halloween? For someone like me who works in a pediatric hospital, Halloween is a fun day of dressing up and creating a fun atmosphere for celebrating our patients. Our day includes a parade around the unit with designated stops for trick-or-treating. At home, my husband and I enjoy using the evening as an opportunity to interact with our neighbors and to admire all of the great costumes that come to our door. We also enjoy the teenagers who come by later in the evening and make sure that we have some of the better treats on hand for them.
This particular October 31 happens to mark the 500th anniversary of what is regarded as the beginning of the Protestant Reformation when Martin Luther pinned his 95 theses to the cathedral wall in Wittenberg, Germany. One of the books of the Bible that was particularly meaningful to Luther was the book of Galatians through which he came to understand the freedom that he had through the grace that had been extended to him through Christ's death and resurrection. I will close this post with Paul's instructions regarding this gift of freedom. 
For you were called to freedom, brethren; only do not turn your freedom into an opportunity for the flesh, but through love serve one another. Galatians 5:13

Tuesday, October 10, 2017

Harvest Season

The project I am featuring in this blog post isn't new, but it is one that seemed fitting to close out September. I really did write this post in September, it took me until early October to get the pictures included. Throughout September and October our weekends tend to be filled with harvesting the produce from our garden. Here's a quick look at some of the tomatoes that became roasted tomato basil soup earlier this season. 
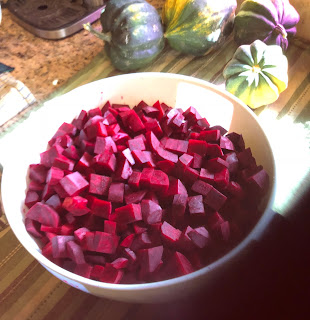
Last week I pulled some of the beets from our garden and chopped them to make borscht. In case you don't know what borscht is, it is a Russian beet soup, and it is very good despite what my daughter may say. You can also see some of the acorn squash from our garden behind the beets. We will be making them into stuffed squash with sausage and wild rice. 

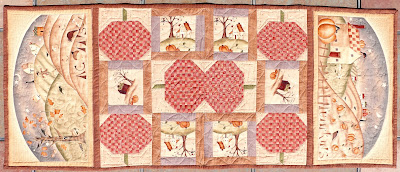
So, let's get back to this project. This table runner is one that was included in a pattern published by Red Rooster Fabrics back in 2010 for use with their Harvest Town fabric line. Although the pattern is still available as a free download, the fabric is a little harder to find anymore. As August fades away, I'm one who is eager to bring out the fall decorations. That being said, the more overt Halloween items need to wait until October. For me, designs like this one are great for filling that gap during September and can continue to celebrate fall even through the Thanksgiving season.
This is also a project that features some of my attempts at machine quilting. I've shared some of the techniques for machine quilting using a walking foot, a machine quilting technique with which I am becoming more confident. I also used free motion machine quilting on this project, a technique with which I am much less confident. 
Free motion machine quilting can be thought of as drawing by having the pencil remain in place while the artist moves the paper around. The above picture illustrates the foot that is placed on the machine. Free motion quilting also requires that the feed dogs on the machine are lowered so that the quilt "sandwich" can be maneuvered more easily. Another challenge with this technique is keeping an even speed and motion so that the stitch lengths are equal. Let's just say that I am still developing with this technique. Here are a few close ups of my efforts. For some of the free motion work, I tried to trace along the print of the fabric. In other areas, I used more of a freestyle approach.

Over the past few weeks, I've become more convicted of a different type of harvest - this one involving people. Through some recent conversations, I've seen evidence of how God is at work in the lives of people, seeking them and drawing them to Himself. These encounters have reminded me of Paul's instruction to Timothy to "be ready in season and out of season." I've also been reminded of the need to pray for others to join in the work of the harvest and that the harvest is not mine, but God's. I will close with Jesus' instructions as he was sending out the seventy:
The harvest is plentiful, but the laborers are few; therefore beseech the Lord of the harvest to send out laborers into His harvest. Luke 10:2

Sunday, September 3, 2017

Roasted Tomato Basil Soup

As we move into the harvest season of late summer and early fall, keeping up with the abundance of produce from the garden can be challenging. I always appreciate recipes that will quickly use large quantities of whatever is currently "on." This weekend, I found myself with nearly 10 pounds of ripe tomatoes and resolved to put them to good use. 
That "good use" turned out to be a triple batch of roasted tomato basil soup. We certainly enjoyed it, and I hope that you will, too.
Before I proceed to the recipe and instructions, here are a few background comments about tomatoes and basil – 
Tomatoes actually had their origin in the Western Hemisphere and were cultivated by people living in Mexico by around 500 BC. The Spanish conquistadors brought the tomato to Europe in the 1500s and also distributed it among their colonies in the Caribbean and even the Philippines. In the mid-1500s, tomatoes were cultivated primarily as ornamental plants in Italy, however, by the end of the 1600s, published recipes using tomatoes began to appear. By 1710, tomatoes were being grown in present-day South Carolina. Whether they arrived via Great Britain or the Caribbean is unclear.
So are tomatoes fruits or a vegetables? Although, botanically speaking, tomatoes are a fruit, that question became significant for financial reasons in 1887. At that time, US tariff laws placed a duty on fruits but not vegetables. To address that issue, the US Supreme Court declared the tomato a vegetable based on its use in 1893.

Basil seems to have a little less controversy regarding its classification. It is believed to be native to India and has been cultivated there for about 5,000 years. Basil grows best in warm, dry climates and is very sensitive to cold. This probably explains its widespread use in Italian and Southeast Asian. Here in the Intermountain West, I generally wait until late May to plant mine. Although sweet basil is the most commonly grown type of basil, over 160 varieties are available. The term basil is derived from the Greek word basileus, meaning king, and many regard it as the king of herbs. 
Now, let's put this soup together. This recipe will yield about 8 servings.
Ingredients:
3 pounds of fresh tomatoes cut into halves or quarters
1/4 cup plus 2 tablespoons olive oil
1 tablespoon kosher salt
1 1/2 teaspoons ground black pepper
6 minced garlic cloves - feel free to use less if you wish
1 medium sweet onion, chopped
2 tablespoons butter
1/4 teaspoon red pepper flakes
1 28-ounce can of diced tomatoes or 1 quart of home canned tomatoes with the juice (Note: if you have additional fresh tomatoes that you want to dice up and substitute for canned ones, I anticipate that would be just fine)
1 to 1 1/2 cups fresh basil leaves (depending on your preferences, you can use more or less)
1 teaspoon fresh thyme leaves
1 quart chicken stock or water (I use chicken stock)

Steps
1. Combine the fresh tomatoes, 1/4 cup olive oil, salt, pepper, and garlic together such that the tomatoes are coated with the oil. Spread the mixture out onto a baking sheet and roast at 400ºF for 45 minutes. What to do about the tomato skins: I kept the skins on for about 2/3 of the tomatoes and peeled the other 1/3. I chose to peel the ones with cracks or rougher areas on them. As you boil the ingredients together and then use the immersion blender, the skins really don't become an issue at all. Here is one of my pans ready to go into the oven.

Here they are after having been roasted. I really liked tossing the minced garlic in to be roasted along with the tomatoes.
2. Saute the chopped onion in 2 tbsp olive oil, the butter and red pepper flakes until the onion becomes translucent.
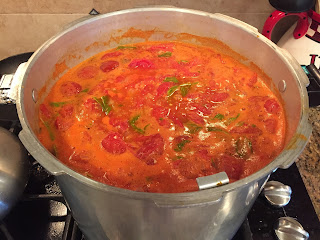
3. Stir in the canned tomatoes, basil, thyme, chicken stock, and the roasted tomatoes (including the juice). Don't worry about cutting up the basil leaves, you will be blending them later. Bring to a boil and simmer for about 40 minutes. Here is my soup simmering on the stove. Remember that I made a triple recipe - hence the large, nearly full cooking pot.
4. Allow the soup to cool and blend with an immersion blender to desired consistency. I blended ours to be fairly smooth with a few tomato pieces remaining.
5. Enjoy with a grilled cheese sandwich or some good warm toasted bread.