Back in November, I shared some of my experiences as a quilt block tester. Quiltmaker magazine has just released volume 11 of their 100 blocks magazine. I once again served as a block tester. This post features the 14 different blocks that I tested. I'm also sharing links to the designers' web pages so that you can check out more of their work.
The block at the top is my favorite of this group. It is titled "Snow Cat" and was designed by Jennifer Ball. The cat is cut from wool felt, and I liked the black background that gave the appearance of a nighttime snowfall.
The block at the top is my favorite of this group. It is titled "Snow Cat" and was designed by Jennifer Ball. The cat is cut from wool felt, and I liked the black background that gave the appearance of a nighttime snowfall.
This time around, I had a number of appliqué blocks to test. Continuing with the animal/pet theme, the block on the left was titled "Across My Heart" and was designed by Amy Rullkoeter who is a contributing editor for Quiltmaker magazine. The block on the right was titled "Hang Ten" and was designed by Margie Ullery of Ribbon Candy Quilt Company. Margie was one of the teachers on the Alaskan quilting cruise I took last June and designed the quilts featured in Sewing at Sea Part II. On a fun note, I received this block to test right after I had returned from a meeting in Maui.
These next two blocks have more of a floral theme to them. The one on the left is titled Sun Shower and was designed by Beth Helfter. The one on the right was simply titled "Whimsy" and was designed by Karen Comstock of Quiltricks.
Continuing with the floral theme, this next block is titled "Hexadaisy" and was designed by Emily Breclaw. This block features 42 paper-pieced shapes, and was the most time-consuming of the blocks that I tested. For this one, I needed to trace and cut all of the paper templates, cut and baste the fabrics to the templates, stitch the individual pieces together and then blind stitch them to the background.
I also continued to expand my paper-piecing skills. This block was my favorite of the paper-pieced ones. It is titled Basket Star and was designed by Marjorie Rhine. I liked the way that the batik fabrics worked together.
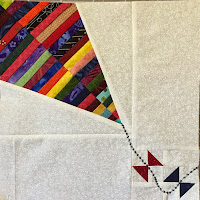
The anchor block on the left was probably the most challenging block to piece with its multiple individual pieces and paper-pieced units to put together. It is titled "By the Sea" and was designed by Barbara Cain. The kite on the right was a great way to use up multiple small scraps. It is titled A Kite's Tale and was designed by Nova Birchfield. I tried out one of the decorative stitches on my machine to create the kite string.This final paper-pieced block provided another fun way to use up scraps and to combine them in a fun way. I liked the opportunity to mix and match different shades as well as fabric styles within the block. It is titled Scrappy Strippy Kisses and was designed by Heather Kojan.
I also had a few traditional pieced blocks to test. The one on the left is titled Sparkler and was designed by Donna Benham. The one on the right is titled Capital Square and was designed by Kari Carr.
A couple of pieced blocks featured unique patterns within the block. The one on the left is titled Points In and was designed by Denniele Bohannon. The one on the right is titled Reflection and was designed by Denise Starck, the art director for Quiltmaker Magazine. Can you spot my piecing error in this one?
The final block that I am featuring in this post is titled "Friendship Circle" and was designed by Corey Yoder. It features thirteen tiny friendship stars. I chose to use prairie style prints for the star points.
As I come to the end of this post, my season as a quilt block tester is also coming to a close. I have greatly enjoyed the opportunity to serve as a tester for three magazine issues and even to design a quilt with some of the blocks I tested. Working on the test blocks has challenged me, helped me develop new quilting skills, and has helped prepare me to for some new projects that I might otherwise not have pursued.
For the present, I'm finding that I need to devote some additional time to some other projects and pursuits so this is a good time to bring this season of testing to a close. I will simply close this post with a few words from Solomon.
There is an appointed time for everything. An there is a time for every event under heaven. Ecclesiastes 3:1


